

Making custom moon phase posters with the Moon Phase Generator
Difficulty: easy. Time: about 5 minutes. Best methods: printing and framing, plus laser engraving or cutting from the SVG.
The Moon as it appeared on a wedding night, a birthday, or the day someone was born makes an intimate keepsake. This tool computes the exact illuminated fraction and phase for the date, time, and place you choose, and draws the terminator faithfully. Style it as art for a print, or switch to laser mode for a layered SVG ready to engrave or cut.

On this page (6)
What you need
- Printing: any home printer or a print shop, plus paper or card and a frame
- Laser engraving: a wood, acrylic, or slate blank and the layered SVG
- Laser cutting: the SVG with the frame layer set to cut
- Extras: nothing to install, everything runs in your browser
1. Set the date and place
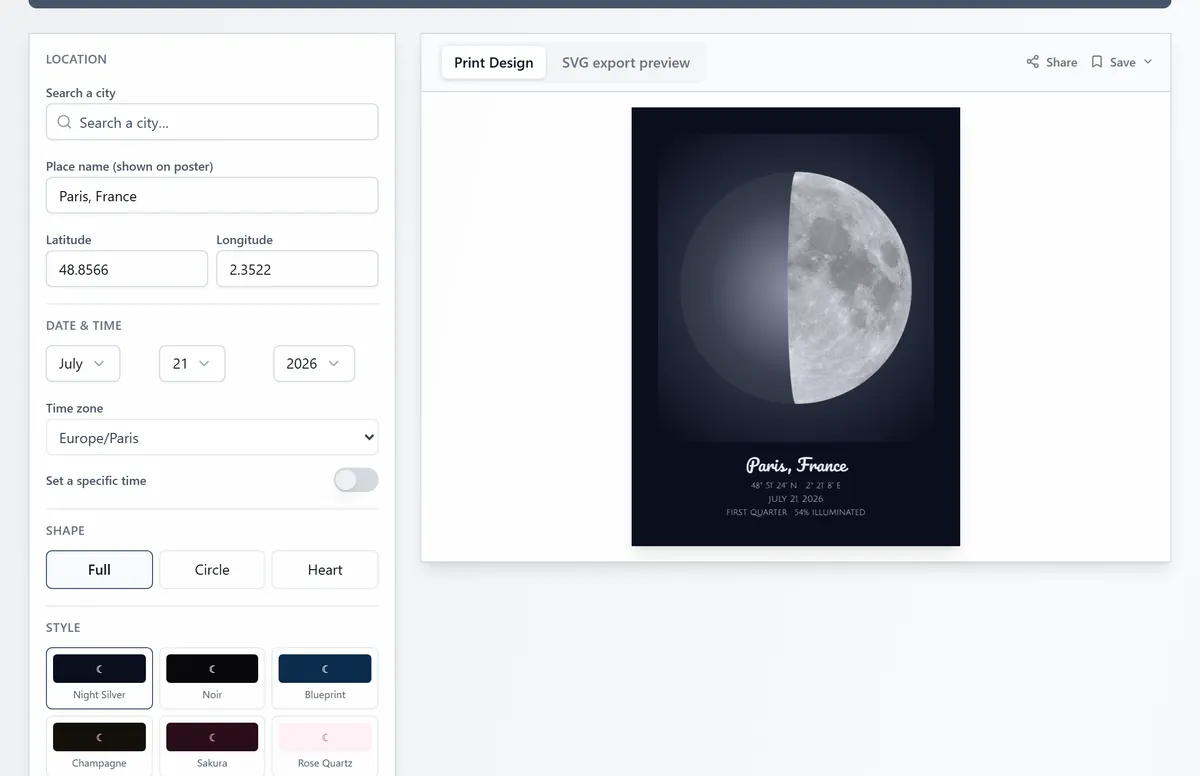
Pick a place and choose the month, day, and year, plus an optional time. The Moon's phase and the illuminated side are computed for that exact moment, so the crescent or gibbous shape matches what was really in the sky.
2. Choose a shape and style
Choose a full, circle, or heart layout, pick a palette or set your own background and moon colours, and toggle the glow and any texture or crater detail.
3. Add your words
Add the place, date, coordinates, and a personal dedication in your choice of fonts, and add a border frame to finish it.
4. Export
Download a high-resolution PNG or a print SVG for framing, or a laser SVG with the moon, text, and frame as separate coloured groups. Open it in the Design Editor for further edits.
Choose your build method
Printing
Home and print-shop printing
- Match the size to your paper or frame, or set a custom size in millimetres.
- Keep the glow on for a luminous moon, or use a light palette for a minimalist print.
- Print the PNG at home, or send the SVG or PNG to a print shop.
- Frame it with a matching aspect ratio so the moon sits centred.
Laser Engraving & Cutting
Engraving and cutting from the layered SVG
- Download the SVG for laser; the moon, text, and frame export as separate coloured groups.
- In LightBurn (affiliate link) or xTool the colours map to operations: the lit moon engraves, text engraves, the frame cuts.
- Use a high-contrast palette so the terminator reads clearly in one tone.
- Test on a small offcut of wood or acrylic, then run the full size.
Next steps and project ideas
- Birth-moon poster with the baby's name and birth details.
- Wedding-night moon in a heart shape with the couple's names.
- Anniversary keepsake of the moon on the night you met.
- Engrave the moon phase onto a wood disc for a rustic wall piece.
- Cut a circular acrylic moon with the frame set to cut for an edge-lit light.
- Set of moon phases across a month as a matching framed series.
Take the design into your software
Was this guide helpful?
More in Map Designer

Keep up with MyLaserTools.
Email me about new tools, product updates, tutorials, and occasional MyLaserTools offers. Unsubscribe at any time.
© 2026 MyLaserTools.com. All rights reserved.