Making a floating two-layer wall map with the UV Printed Layered Map preset
Difficulty: Intermediate–Advanced (two processes + hardware assembly) · Time: 2–4 hours plus print turnaround · Methods, ranked: 1) UV print + laser-cut acrylic on standoffs (the intended build), 2) UV print + engraved clear acrylic top sheet (simpler, no fragile cut network), 3) high-res PNG photo print behind laser-cut top layer if you don't have UV access.
This is the showpiece build: a full-color UV-printed city map as the back panel, with the major street network cut from acrylic floating 10–15 mm above it on metal standoffs. The shadow the street layer throws onto the printed map gives real depth - it reads like a piece you'd see in a design store. It's for makers with access to both a flatbed UV printer (or a print service) and a laser, and it makes a serious statement gift or a premium product listing.
What You'll Need
UV print + laser (recommended)
- Flatbed UV printer, or a local print service that prints on rigid stock
- Back panel: 3 mm acrylic (white prints best), aluminum composite (Dibond), or quality laser-grade plywood, ~300×300 mm
- Top layer: 3 mm cast acrylic - black or frosted for contrast, or clear for a subtle look (gloss, matte, and glitter finishes each read differently up on standoffs)
- Laser cutter (CO2 or diode strong enough for 3 mm acrylic)
- 4× anodized standoff spacers (multiple colours), M3 or M4, 10–16 mm barrel length (the brass/chrome "sign standoffs")
- Drill or laser for the mounting holes, step bit if drilling acrylic
PNG photo-print fallback
- The exported 4096 px PNG printed on photo paper or directly on board by any print shop, plus everything in the laser list
Step 1 - Start from the preset
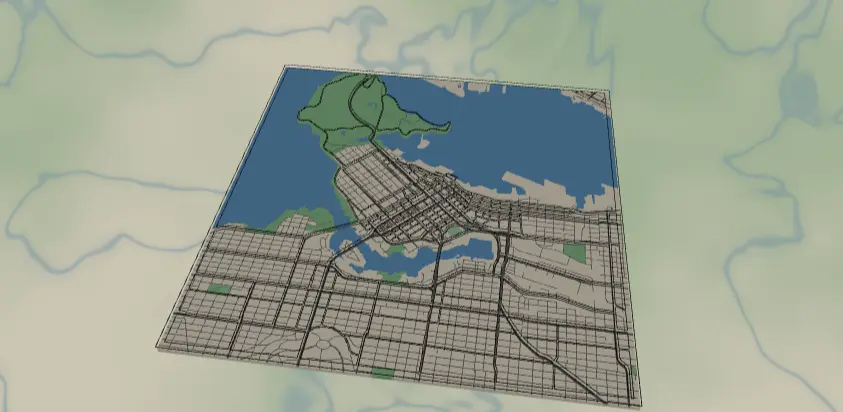
Open the UV Printed Layered Map preset. It loads on Vancouver at zoom 12.4 with a square frame - a city built around water, which is exactly what this preset loves: the printed layer shows the blue, and the cut street layer floats over it.
Framing tips:
- Pick a framing where major roads reach the edges on at least three sides - in Cut mode the streets merge with the border frame, and edge-touching roads are what hold the cut layer together.
- Water-heavy cities (Vancouver, Amsterdam, Stockholm) look spectacular, but check that bridges connect your islands to the frame - an isolated island's streets become a floating fragment.
- Zoom 12–12.5 for a whole city, 13–13.5 for a downtown core.
Step 2 - Tune the layers
Two layer groups, one per physical part:
Acrylic streets - Cut mode (outline: true, padding 12): motorway (width 5), primary (4), secondary (3) and tertiary (2) roads are buffered into contours and merged with the black border frame into one connected cuttable piece. If your final piece is 300 mm, the width-2 tertiary ribbons are slim - they cut fine in cast acrylic but handle the piece gently, or raise tertiary to 3 if your city is sparse. Removing tertiary entirely gives a bolder, sturdier top layer.
Printed map - Solid mode, the full-color art for the UV print: cream land (#EDE6D6), two greens for parks and recreation areas, blue water and rivers, and the full road hierarchy down to neighborhood streets in grey (#5C5C5C). This is where you play with color - try a navy-land/white-road night palette, or shift the parks toward sage. Keep the printed roads grey-ish and mid-tone: they should support the floating black layer, not compete with it.
Make sure the two layers tell one story: the cut streets sit exactly above their printed twins, so any color you choose for the printed roads becomes the "shadow twin" of the acrylic ones.
Step 3 - Export
In the export modal:
- Printed map layer: toggle off "Acrylic streets," download the high-res PNG (4096 px) with the Background toggle on. At 300 mm that's ~340 DPI - plenty for UV.
- Acrylic streets layer: toggle off "Printed map," download the per-layer SVG.
- Corner holes - this is the key option. Enable Corner holes in the Mounting holes panel. Because mounting holes are applied to every layer, both exports get holes in identical positions - your standoffs will line up perfectly through the print and the acrylic. Match the hole diameter to your standoff screws (M3 ≈ 3.2–3.5 mm clearance) and keep the inset clear of the border frame.
- Turn on small-polygon cleanup so no orphaned street slivers fall out of the cut.
Choose Your Build Method
UV print + laser-cut acrylic on standoffs
- UV-print the PNG on the back panel at final size (300×300 mm is a sweet spot). If outsourcing, send the PNG plus the size and ask for the corner holes drilled - or print first and drill yourself using the SVG as a template.
- Laser-cut the street layer from 3 mm acrylic using the SVG at the same dimensions. Leave the masking on both faces while cutting to prevent flashback marks.
- De-mask carefully - support the thin street ribbons from below and peel the masking along the roads, not across them.
- Test-fit: lay the acrylic on the print and check the corner holes align and the streets register over their printed counterparts.
- Assemble the standoffs: barrel through the back panel from behind, acrylic on the front cap, snug by hand - acrylic cracks if you wrench it. 10–16 mm barrels give the best shadow.
- Hang with keyhole hangers on the back panel, or use through-wall standoffs to float the whole stack off the wall.
Make It Yours
- Night mode: recolor the Printed map to near-black land with neon road colors, and cut the top layer from frosted acrylic.
- Two-tone shadow play: cut the street layer from transparent colored acrylic (amber, red) so it tints the print below.
- Engrave a title block - city name + coordinates - into the bottom border of the acrylic layer before cutting.
- Go big: 450 mm with M4 standoffs and 5 mm acrylic for a lobby-scale piece (bump all stroke widths ~50%).
- Swap the back panel for brushed aluminum composite - UV ink on brushed silver makes the water shimmer.
- Make a matching mini: the same two exports at 150 mm become a desk piece on 8 mm standoffs.
- Replace the square with the circle export shape for a porthole look - corner holes become a diamond layout.
New free tools, every month.
New laser cutting tools, what's coming next, and features we're building right now. Only MyLaserTools.com news. No spam, ever.
© 2026 MyLaserTools.com. All rights reserved.