Making a railway-lover's print with the Transit and Rails Map preset
Difficulty: easy. Time: 30–45 minutes per printed piece. Best methods, in order: UV printing, sublimation on mugs and panels (with one contrast tweak), laser engraving (rails-only variant). A 3D plaque is possible but the faded grays are the design's soul and they don't translate well to filament - skip it unless you simplify hard.
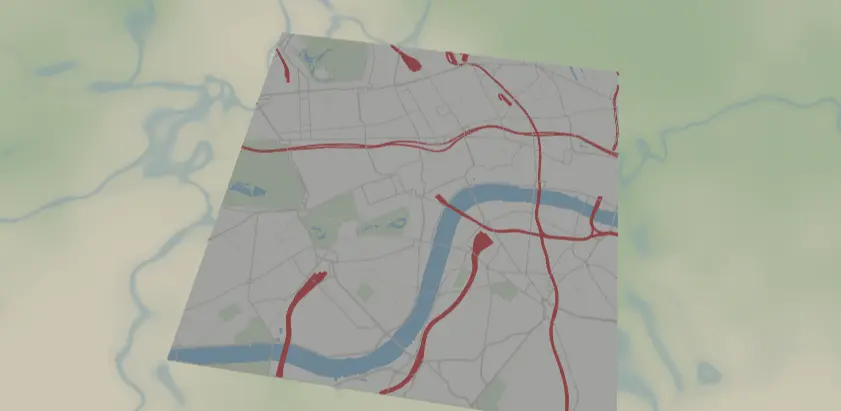
This preset puts the railways first: every rail line in bold signal red over a deliberately faded gray street grid, soft blue water underneath. It reads like a network diagram drawn over a ghost of the city - made for train lovers, commuters, and model-rail people, on mugs, posters, and panels.
What You'll Need
- UV printing: flatbed UV printer, white acrylic, aluminum composite, or light wood panels
- Sublimation: sublimation printer + paper, white poly mugs (with mug press or wrap + convection oven), white poly-coated panels, heat tape, butcher paper
- Laser engraving: diode or CO2 laser, light laser-grade plywood, or red-on-white two-tone acrylic for a cheeky rails-only version
Step 1 - Start from the preset
Open the Transit Rails Map preset. It loads London at zoom 12.6 - wide enough to catch the rail lines converging on the terminus stations from every direction, which is the whole composition: red lines radiating through a pale grid. Search any rail-heavy city (London, Paris, Berlin, Osaka, Zurich, Chicago) and center on the spot where lines converge - a main station, a junction, a river crossing. Keep zoom in the 12–13 band; closer and you lose the radiating-network effect, wider and the faded streets turn to fog.
Step 2 - Tune the layers
One Solid layer group, Rails over streets:
land-#F4F4F2paper white.water-#A9CCE3soft blue; the Thames anchors the London composition, keep your river in frame.landusePark-#DEE8DApale green whisper.- The faded grid:
roadsMotorway#D9D9D6width 3,roadsPrimary#D9D9D6width 2,roadsSecondary#E3E3E0width 1. These are intentionally one step above the background. roadsRailway-#E63946width 4, the entire point of the preset.
The one tweak that matters: those street grays sit only ~7–10% darker than the land. UV printing holds them fine, but sublimation will wash them close to invisible - if you're pressing a mug or panel and want the ghost grid to survive, darken the streets to around #C9C9C4/#D4D4D0 before exporting. The red rails at width 4 are bulletproof in every method.
Step 3 - Export
- UV / sublimation: 4096 px PNG, background ON (the paper-white land is part of the print; on a white blank you can toggle Background off to save ink - the blank plays the paper).
- Laser: per-layer SVG ZIP so the rails can be engraved separately from the grid.
- For mugs, export at the 1-1 aspect and let your mug template crop, or compose wider before export.
- Mounting holes: Corner holes for a panel on anodized standoff spacers; none for mugs, obviously. No cleanup needed - there are no tiny polygons in this palette.
Choose Your Build Method
UV printing
- Export the 4096 px PNG.
- Size in the RIP; UV's tonal fidelity is why this is the top method - the faded grid prints exactly as faint as designed.
- White substrate, direct print; clear acrylic gets a white underbase.
- Print, then optionally hit just the red rails with a gloss varnish pass so they sit proud of the matte grid.
Sublimation
- Darken the street grays first (see Step 2) unless you want a near-pure red-on-white result.
- Print mirrored at final size on sublimation paper.
- For a mug: tape the print around the white poly mug and press in a mug press with the settings recommended for your blank and inks (or wrap and oven per your usual process). For a panel: tape flat, add butcher paper, and flat press with your recommended settings.
- Peel hot. The
#E63946rails transfer rich and saturated; check the ghost grid survived to your taste and adjust the hexes for the next run.
Make It Yours
- Cities where rails are the story: Chicago's L radiating from the Loop, Berlin's Ringbahn circle, Osaka's loop line, Zurich's hauptbahnhof throat.
- Underground swap: land
#1C1C1E, streets#3A3A3C, rails#FFD329- night-tube vibes for UV on black acrylic with Background off. - Heritage swap: rails
#264653and land#F1E9DAfor a vintage timetable look that also engraves much better. - Honor a specific line: add a route layer over your actual commute in a second color (
#2A9D8F) so "your train" stands out from the network. - Frame a single famous junction at zoom 14 - Clapham Junction or Zoo Interlocking - for the deep-cut rail nerd.
- Circle export + Hanger hole = a rail-network ornament for the model-train tree.
- Press a mug-and-coaster pair: same artwork, mug wrap crop plus circle crop.
- Pair with the Airport Diagram preset of the same city - planes and trains, matching panels.
New free tools, every month.
New laser cutting tools, what's coming next, and features we're building right now. Only MyLaserTools.com news. No spam, ever.
© 2026 MyLaserTools.com. All rights reserved.