

Making a pilgrim's temple map with the Temple Trail Map preset
Difficulty: Easy. Time: under an hour of design time, then your machine's run. Best method: laser engrave the vermilion temple shapes against the paper base, or print it full-colour. Premium preset.
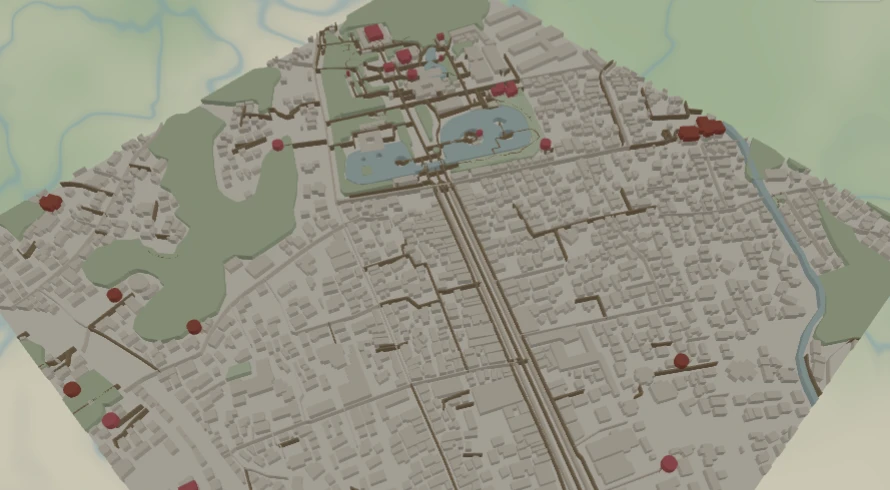
This is a premium preset built to show off the Points of Interest layer - a feature that was born directly from customer requests to mark religious buildings on Kamakura and Kyoto maps. The Temple Trail Map centres on Higashiyama in Kyoto at close zoom (14.4) in a square (1:1) frame: a soft paper-toned base map of land, water, parks, forest, buildings and roads, with a second layer that lights up every Buddhist temple and Shinto shrine in vermilion.
The clever part is how the temples are drawn. The Points of Interest layer is set to "Building highlight" mode, so each temple or shrine point is matched to its actual building footprint from OpenStreetMap and that footprint is filled in colour. Where no footprint is found, the point falls back to a coloured dot. The result reads like a pilgrim's map - the old city's sacred buildings glowing against calm paper - and it works equally well as a laser-cut or engraved keepsake and as a full-colour print.
What You'll Need
Laser cutting / engraving
- The exported per-layer SVG ZIP
- A light wood, bamboo or paper-toned coated tile that gives contrast when engraved
- Any diode or CO2 laser
- Optionally a second sheet of vermilion or red stock to cut the temple footprints as a top layer
UV print / sublimation
- The exported high-res PNG (4096 px)
- UV flatbed printer, or a sublimation setup with a coated blank (wood, hardboard, aluminium)
- Light or white blanks keep the vermilion and paper tones true
Poster / paper print
- The exported high-res PNG sent to a photo lab or printed on matte or textured art paper
- A frame; a natural wood or sumi-black frame suits the old-city look
Step 1 - Start from the preset
Open the Temple Trail Map preset. It opens on the Higashiyama temple district of Kyoto at zoom 14.4 in a square (1:1) frame. Pan so the cluster of temples and shrines you want sits nicely in the middle. Keep the zoom close - around 14 to 15. The Points of Interest markers come from OpenStreetMap and only load at close zoom (they fetch from zoom-14 tiles), so if you zoom out too far the temples and shrines vanish. Stay in the 14-15 range and they stay lit.
Step 2 - Understand the two layer groups
The preset has two layer groups. The first, "Old city base", is the soft paper-toned street map - all Solid fill and line, so its palette is your only dial:
- Land background - Solid fill, warm paper
#F3EFE6. The calm base the whole design sits on. - Water - Solid fill, muted teal
#BFD3D0. The Kamo River and any ponds read as a soft accent. - Parks - Solid fill, pale green
#D6E0C4. The temple gardens and green spaces. - Forest - Solid fill, deeper green
#C7D6AF. The wooded Higashiyama hills behind the temples. - Buildings - Solid fill, soft stone
#E7E0D2. The blocks of the old city, kept quiet so the temples stand out. - Primary roads - Solid line, warm grey
#DDD3C0(width 2.4). The main streets through the district. - Secondary roads - Solid line, lighter warm grey
#E1D8C7(width 1.7). The connecting lanes. - Streets - Solid line, palest warm grey
#EAE2D3(width 1). The fine mesh of alleys.
The whole base is deliberately soft and low-contrast so the vermilion temples carry the eye. The second group, "Temples & shrines", is the star - the Points of Interest layer, covered next.
Step 3 - The temples and shrines (the POI layer)
The "Temples & shrines" layer shows two Points of Interest categories, each in its own colour: Buddhist Temples in vermilion #B7410E and Shinto Shrines in a lighter red #D64550. It is set to Building highlight marker style, and this is the detail worth understanding:
- Building highlight (used here) - each temple or shrine point is matched to its real building footprint from OpenStreetMap, and that footprint is filled in the category colour. Where no footprint is found for a point, it falls back to a coloured dot.
- Symbol only - every point always renders as a dot or icon, ignoring building footprints. Useful when you want uniform markers rather than real building shapes.
Temples often sit on large precinct grounds with many structures, so a single temple point usually lights up just one main hall building rather than the whole complex. Hit rates vary a lot - roughly 1 in 3 down to 1 in 10 temples will match a footprint, and the rest show as dots. This is expected and part of the look: a few bold vermilion footprints among a scatter of dots reads exactly like a pilgrim's trail map. If you'd rather every marker be identical, switch the layer to Symbol only.
You can edit this layer freely. Open it and you can add more categories - All Places of Worship, churches, mosques, castles, viewpoints or gardens - set a colour per category, and switch the marker style. Note that places of worship have no default symbol, so in Symbol-only mode they render as plain filled circles, and in Building-highlight mode as filled footprints where found.
Step 4 - Export
- Laser: export the per-layer SVG ZIP. The temple and shrine footprints come out as their own vector shapes - engrave or cut them against the paper base for a two-tone piece.
- UV / sublimation: export the high-res PNG (4096 px). Keep the Background toggle on for the paper field, or turn it off for a transparent background to let a wood blank show through.
- Poster: same high-res PNG, sized to your paper. The square 1:1 frame suits a 12x12 or 20x20 print.
Choose Your Build Method
Engraved two-tone tile
The vermilion temple footprints engrave beautifully against the soft paper base. A laser can't reproduce the colours, but the temple shapes carry the whole design in tone.
- Export the per-layer SVG ZIP. The temple and shrine footprints are their own layer, separate from the base street map.
- Engrave the base street network as a light raster or leave it off entirely, then engrave the temple and shrine footprints darker so the sacred buildings stand out against the wood or coated tile.
- The line-width hierarchy in the base (primary thickest, streets thinnest) carries through in greyscale if you choose to include the roads.
- Cut the tile to the square frame and mount it to a backer with 3M tape, or add a snap clip for a hangable keepsake.
Cut vermilion top layer over wood
For a layered piece, treat the temple footprints as a cut top layer sitting proud of the base.
- Engrave the paper-toned street map onto a light wood or bamboo base.
- Cut the temple and shrine footprints from a sheet of vermilion or red stock - painted acrylic or coloured veneer both work.
- Glue or 3M tape the cut temple shapes onto the engraved base in position, so the sacred buildings sit as a raised vermilion layer over the old city.
- The dot-fallback markers can be cut as small discs from the same vermilion stock, or engraved directly into the base for a subtler mix.
Make It Yours
- Centre it on another temple town: Kamakura or Nara in Japan both have dense temple-and-shrine clusters that light up beautifully in Building-highlight mode.
- Map your own city's sacred buildings instead - add the churches, mosques or synagogues category and recolour to suit.
- Switch the layer to All Places of Worship for a full spiritual map of a district, mixing every faith in one colour or a colour each.
- Recolour the temple footprints to gold-leaf yellow or sumi-ink black for a more restrained, calligraphic finish.
- Add temple names and coordinates in an elegant typeface for a labelled pilgrim's map.
- Layer the vermilion footprints as a cut top layer over a wood base for a raised, tactile piece.
- Use a portrait frame with a title band - "Higashiyama" or the temple-town name across the top - for a clean poster finish.
- Toggle between Building highlight and Symbol only to compare the real-footprint look against uniform dots, then keep whichever suits the district's temple density.
New free tools, every month.
New laser cutting tools, what's coming next, and features we're building right now. Only MyLaserTools.com news. No spam, ever.
© 2026 MyLaserTools.com. All rights reserved.