Making an openwork street ornament with the Stylish Outline preset
Difficulty: Easy. Time: under an hour. Best methods, in order: laser cutting (it's the point), 3D printing, UV print (stencil-style graphic).
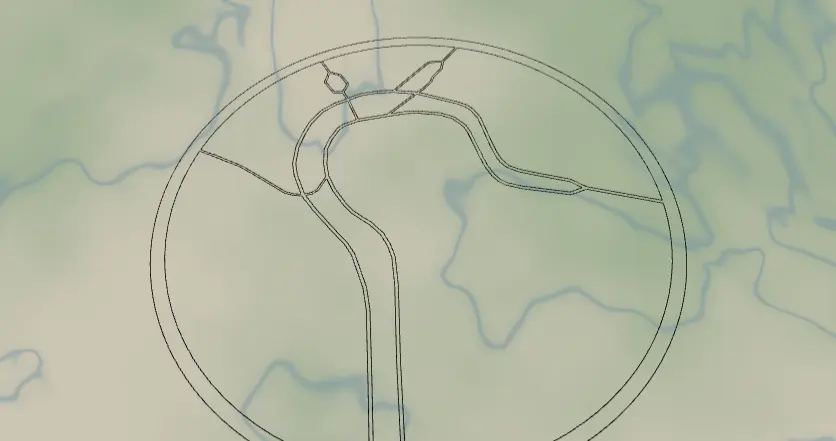
This preset is a single-layer showpiece: a tight, close-up circle of streets rendered in Cut mode, so the whole road network becomes one connected, lace-like piece you can cut from a single sheet. No backplate, no stack - the negative space is the design. Perfect for ornaments, suncatchers, and minimalist wall pieces.
What You'll Need
Laser cutting
- One sheet of 3 mm laser-grade plywood, bamboo, or acrylic (clear acrylic makes a great suncatcher)
- Laser cutter, light sandpaper, a ribbon or cord if hanging
3D printing
- Any FDM printer, one color of PLA
UV print / sublimation
- High-res PNG (transparent background) and a blank - the design doubles as a bold one-color graphic
Step 1 - Start from the preset
Open the Stylish Outline preset. It loads on a London intersection at zoom ~17.2 - much closer than other presets, just a few blocks. That's intentional: at this scale each street is wide enough to survive as a physical strut. Search your place, then pick the exact corner: an interesting junction, a roundabout, the block with your front door. Stay in the 16.5–17.5 zoom range; zooming out too far makes the lattice too fine to cut.
Step 2 - Tune the layers
One layer does everything:
- Layer 1 - Cut mode (outline on) with padding 20, which becomes the solid ring frame around the circle. Inside it: motorways and motorway links at width 5, primary at 3, secondary/secondary links/tertiary at 2 - all black. There's also a hidden
landfeature (white) you can switch on to preview the piece against a background. Every road is buffered into a contour and merged with the ring, so the export is one connected piece.
Tuning tips: if your area has no motorways, the width-5 anchors disappear - bump roadsPrimary to 4–5 so the lattice keeps some heft. If thin width-2 struts look risky, raise them to 3 or toggle off roadsTertiary.
Step 3 - Export
- Laser: single combined SVG - it's one layer, one cut file. Small-polygon cleanup on to drop enclosed slivers. Add the Hanger hole ring mounting option for an ornament loop.
- 3D printing: STL (one color, one piece).
- UV print: high-res PNG with Background off - since there's no backplate and land is hidden, you get the pure black lattice on transparency, ready to print on anything.
Choose Your Build Method
Laser cutting
- Import the SVG into your laser software and scale: 90–120 mm for ornaments, 200–300 mm for wall pieces. Don't go below ~80 mm at these street widths or interior struts get matchstick-thin.
- Cut everything as vector cut lines - interior street contours and the outer ring in one job. Use enough passes for clean release; openwork pieces snag if half-cut.
- Push out the waste pieces gently from the back; tweezers for the small windows.
- Light sanding both faces; ease any charred strut edges by hand.
- Thread a ribbon through (or through the hanger ring if you added one; a snap clip turns it into a bag charm). For wall pieces, two pin nails through street junctions disappear completely.
Make It Yours
- Junction-rich spots shine: London roundabouts, Paris étoiles, Barcelona chamfered corners, your own five-way intersection.
- Clear or colored acrylic + a window hook = street-map suncatcher.
- Switch the hidden
landfeature on and recolor it (#F5EFE0cream) for the print version with a solid disc behind the lattice. - Bump all widths up one step and cut from 5 mm walnut for a chunky trivet.
- Set padding higher (30+) for a wider ring frame you can engrave a name and coordinates into.
- Swap
exportShapeto hexagon for a honeycomb ornament series of your city's landmarks. - Earring-scale dare: 50 mm, motorway-only (toggle the rest off), 3 mm acrylic.
New free tools, every month.
New laser cutting tools, what's coming next, and features we're building right now. Only MyLaserTools.com news. No spam, ever.
© 2026 MyLaserTools.com. All rights reserved.