3D printing a route map with the Best Lap preset
Difficulty: Beginner–Intermediate · Time: 1–3 hours of print time once exported · Intended for 3D printing - export a multicolor 3MF for the red-line-on-dark-track stack, or a single-color STL where the route reads purely as raised relief.
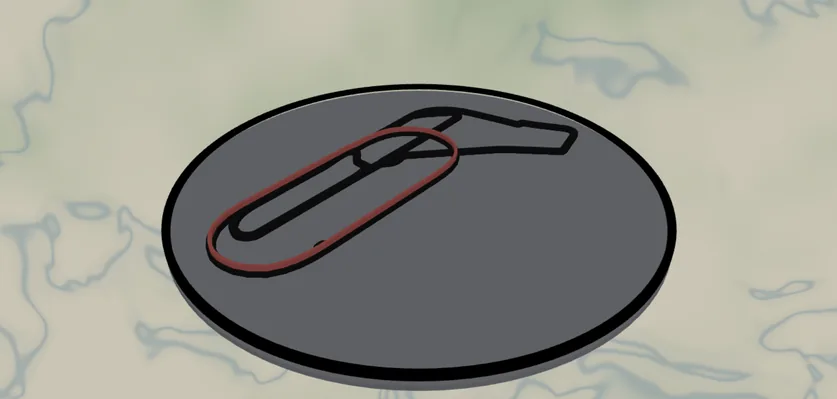
A lap worth keeping, frozen in relief. This preset is the 3D-print build of the route map: a recorded track drawn as a bold red line that prints as a raised ridge standing proud of a wide, solid track body, all on a solid backplate. It ships preloaded with the Monza high-speed oval - a flying lap captured as relief - so you can see the styling immediately, then you replace the line with your own recorded route. A circuit, a marathon, a half, a favorite training loop: the route is the hero, raised above everything else.
Because the route is the raised hero, this build is all Solid bodies and the Cut outline - no Score lines. A Score (line-mode) layer is a single centerline with no width, so it has nothing to extrude into relief; the route here is given real width so it prints as a continuous ridge you can feel. Export a 3MF to get the red line, the dark track, and the backplate pre-stacked in color, or an STL to print the whole relief in one filament and let the height of the route line carry the design.
What You'll Need
3D printing (recommended)
- Any FDM printer; PLA or PETG in red (the route), a dark color (the track), and a backplate color
- Slicer that accepts 3MF (Bambu Studio, PrusaSlicer, OrcaSlicer); an AMS/MMU or a manual filament swap to get the red line on a dark track
- Your GPX file if printing a real route: export it from Strava, Garmin Connect, COROS, the race/timing site, or your watch ("Export GPX")
Laser cutting (alternative)
- 3 mm Baltic birch or dark acrylic for the track, red acrylic for the route line
- Laser cutter, glue or 3M tape
Step 1 - Start from the preset
Open the Best Lap preset. It loads on the Autodromo Nazionale Monza at zoom 14.4 with the racing line already drawn in red over the dark track, framed as a circle.
Make it yours: use Add layer → Route and upload your .gpx, then delete or hide the sample Racing line layer. Re-search the map location to your route and frame it.
- Frame the route, not the whole city: zoom until the line fills the middle 60–70% of the frame.
- Loops and circuits look great centered; point-to-point routes read best running diagonally corner to corner.
- Keep the route a clean, continuous line - that continuity is what lets it print as one unbroken ridge.
Step 2 - Tune the layers
Three layer groups, all Solid bodies that stack into relief:
- Racing line - your route (a Route layer), red (
#E10600) at width 5. This prints as the raised ridge standing proud of the track - the boldest, tallest mark on the piece. Thicken to 6–7 for long or zoomed-out routes so the ridge stays solid; recolor to a race's branding. - Track - Solid mode, dark grey (
#1A1A1A), the raceway feature at width 12. A wide solid band the route ridge sits on top of. For a running or cycling route, this is the road/path the route follows - widen or narrow it to taste. - Backplate - solid base body,
#8d949egrey. The floor everything stacks on; it sets the print's overall thickness. Shift toward black for a sportier, higher-contrast look.
Step 3 - Export
- 3D printing: export the 3MF for the multicolor stack - red route ridge, dark track, grey backplate pre-stacked and colored - or an STL for a single-filament relief print.
- Small-polygon cleanup on so stray fragments don't leave unprintable specks.
- Hanger hole at export if it will hang from cord or lace.
- Laser (alternative): per-layer SVGs - the route as a cut/inlay line, the track and backplate as cut bases.
Choose Your Build Method
3D printing
- Export the 3MF and open it in your slicer - the red route, dark track, and grey backplate arrive pre-stacked with their colors. The route sits at the top of the stack as a raised ridge.
- Multicolor: assign red to the route, dark grey to the track, grey to the backplate. With an AMS this prints automatically; without one, insert a filament swap to red at the layer height where the raised route ridge begins.
- Single-color STL: print the whole relief in one filament - the route still reads as the raised ridge by height alone. Swap to red partway up to color just the route without an AMS.
- Print flat on the bed, no supports - the backplate is the base and the track and route rise from it.
- Layer height: 0.2 mm. Give the route ridge a clear 0.6–1.2 mm of raised height above the track so it stands out and feels tactile.
- Scale / minimum size: keep it 150–200 mm+ so the width-5 route ridge prints as a solid, continuous line. Below ~120 mm a thin route can break up - thicken it to 7 before exporting if you must go smaller.
- Pop it off the bed - the whole piece is one solid print, no assembly.
Make It Yours
- Finisher's gift: upload a marathon GPX and print the route as a raised ridge, with the race name and time added before export.
- Print the route ridge taller for a dramatic, sculptural relief, or lower for a subtle embossed line.
- Multi-route piece: add several GPX files as separate Route layers in different filament colors - a whole training block in one print.
- Relay or team: each leg in a different color ridge on the same course.
- Real circuits: keep the raceway track and swap in any famous lap - Spa, Suzuka, Le Mans.
- Shift the backplate to black for a sportier, higher-contrast print.
- Add a hanger hole and print at ornament scale for a desk trophy or keepsake.
New free tools, every month.
New laser cutting tools, what's coming next, and features we're building right now. Only MyLaserTools.com news. No spam, ever.
© 2026 MyLaserTools.com. All rights reserved.