Making a running keepsake with the Running Route Map preset
Difficulty: Beginner (print) to Intermediate (laser) · Time: 20 minutes (print) to 90 minutes (layered laser) · Methods, ranked: 1) High-res print / UV print, 2) laser engrave on wood or slate with the route as the deepest tone, 3) layered laser build using the backplate as a frame layer.
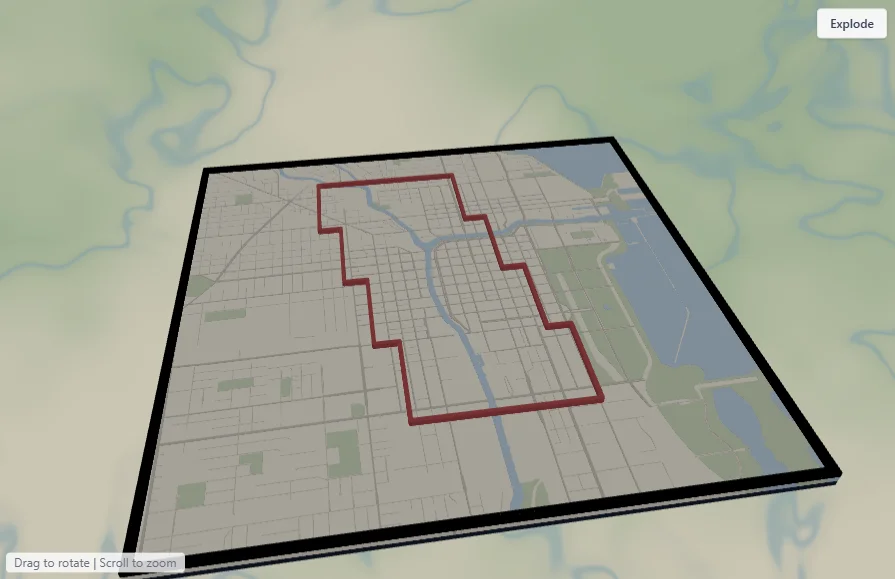
Crossing a finish line - or just logging the miles - is worth keeping. This preset turns the route you ran into wall art: your GPX track drawn as a bold crimson line over a soft, muted city grid on a deep navy backplate. It ships preloaded with a sample big-city loop through downtown Chicago so you can see the styling immediately, then you replace it with your own recorded run. A marathon, a half, a 5K, or a favorite training loop - the most personal running gift there is.
What You'll Need
Print (recommended)
- The exported 4096 px PNG and a photo print service (or your own printer), frame of choice - or a UV flatbed onto white acrylic/Dibond for a premium finish
- Your GPX file: export it from Strava, Garmin Connect, COROS, the race timing site, or your watch ("Export GPX")
Laser engrave
- 3 mm Baltic birch, bamboo board, or a slate plaque; laser engraver
Step 1 - Start from the preset
Open the Running Route Map preset. It loads on downtown Chicago at zoom 12.2 with a sample running loop already drawn in crimson, following the street grid.
Make it yours: use Add layer → Route and upload your run .gpx, then delete or hide the sample Run route layer. Re-search the map location to your city and frame the route.
- Frame the route, not the whole city: zoom until the run fills the middle 60–70% of the square.
- Point-to-point marathons read best running diagonally corner to corner; loop runs look great centered.
- Leave one quiet corner for an engraved or printed caption (race name, date, finishing time).
Step 2 - Tune the layers
Run route - your GPX track, crimson (#C1121F) at width 6. Thicken to 7 for long, zoomed-out routes or for engraving; recolor to a race's branding. Keep it the boldest mark on the piece.
City - the quiet backdrop: off-white land, soft blue water, sage parks, and three muted road tiers. Keep the streets light - if you brighten them the route stops popping. For dense downtowns, hide Streets and keep only Primary roads to declutter.
Backplate - deep navy (#14213D) behind everything. In prints it reads as the frame surround; in layered builds it's the physical base. Shift toward black for a sportier, higher-contrast look.
Step 3 - Export
- Print: high-res PNG (4096 px), Background toggle on. At 300 mm that clears 300 DPI.
- Laser engrave: per-layer SVGs or the combined SVG; colors become engrave-depth hints (route darkest).
- Layered build: export the City SVG (engrave file) and the Run route SVG (cut/inlay file), with the backplate as the cut base.
- Hanger hole if it will hang from cord or lace; small-polygon cleanup on.
Choose Your Build Method
Framed print / UV print
- Export the PNG and print at 250–300 mm square on matte photo paper.
- Add the race name, date, distance, and finishing time as a caption under the map before printing.
- UV variant: print directly on white acrylic or Dibond and float-mount with anodized standoff spacers at the corners (enable Corner holes at export).
Make It Yours
- Finisher's gift: route + "Chicago Marathon · 26.2 mi · 3:42:11" engraved under the map.
- Series wall: one plaque per race, the route color shifting through a gradient down the hallway.
- Multi-run piece: upload several GPX files as separate Route layers in different colors - a whole training block on one map.
- Relay or team: each leg in a different color on the same course.
- Medal hanger: stretch the layout and mount the print above a rail of laser-cut hooks for the medals.
New free tools, every month.
New laser cutting tools, what's coming next, and features we're building right now. Only MyLaserTools.com news. No spam, ever.
© 2026 MyLaserTools.com. All rights reserved.