Making a vintage 70s street map with the Retro 70s Map preset
Difficulty: Easy. Time: under an hour of design time, then your printer's run. Best method: full-colour / UV print (it's a warm-palette poster design). A laser version works as a single engraved tonal tile.
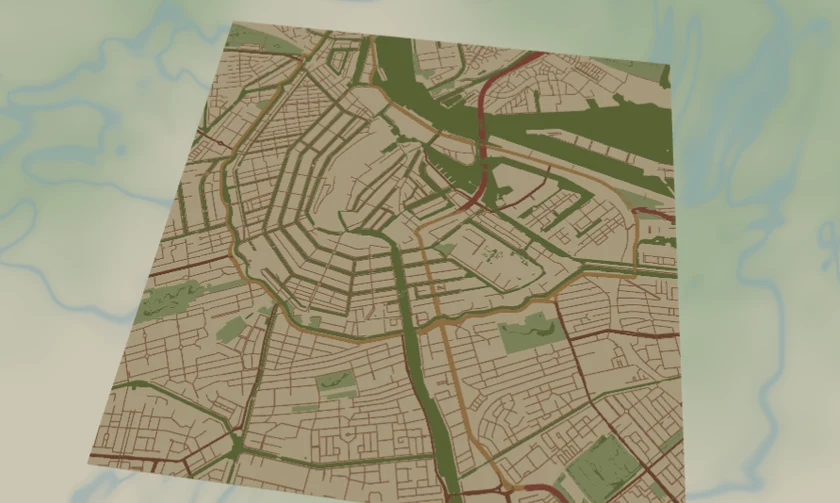
This is a poster-first preset with a retro soul. The Retro 70s Map draws the Amsterdam street network in a 1970s palette - burnt-orange motorways, mustard primaries, brown secondaries and a warm tan street mesh, with avocado-green water on a warm cream base. Everything is solid colour fill, so the whole design rides on that cosy, slightly faded palette. It's made for full-colour and UV prints, framed posters and warm-toned gift items rather than for cutting into layers.
Amsterdam is a great match: its tight ring of canals and dense old-town streets give the warm palette a rich, woven texture, and the avocado-green canals read as a distinctive shape that anchors the whole frame.
What You'll Need
UV print / sublimation
- The exported high-res PNG (4096 px)
- UV flatbed printer, or a sublimation setup with a coated blank (wood, hardboard, aluminium)
- Warm-toned wood or cream blanks complement the palette especially well
Poster / paper print
- The exported high-res PNG sent to a photo lab or printed on matte or textured art paper
- A frame; warm wood or brass framing leans into the 70s mood
Laser (optional, single tile)
- A warm-toned wood or coated tile that engraves with contrast
- Any diode or CO2 laser
- Note: the warm palette won't survive a laser - use it for a monochrome engraved version
Step 1 - Start from the preset
Open the Retro 70s Map preset. It opens on Amsterdam at zoom 13 in a square (1:1) frame, which captures the canal ring and old town - the densest, most characterful part of the city. Pan so the canals fill the frame; their avocado-green shape is what gives the design its anchor. Zoom in to 13.5 for a tighter weave of streets, or out to 12.5 to take in more of the surrounding city.
Step 2 - Tune the layers
The preset is a single layer group, "Retro city", and every feature is Solid fill - there are no cut or score layers, so the warm palette is your only dial:
- Land - Solid fill, warm cream
#F7E7C2. The aged-paper base that gives the whole map its 70s warmth. Push it toward parchment for a more vintage feel. - Water - Solid fill, avocado green
#8FA03E. The canals and harbour become a distinctive olive shape - one of the boldest blocks of colour. - Park / landuse - Solid fill, soft avocado
#C2CE7A. Green spaces echo the water in a lighter tone. - Motorway - Solid fill, burnt orange
#C4451C, the thickest line (width 8). The headline colour. - Primary roads - Solid fill, mustard
#E6A52E(width 5). The classic 70s gold. - Secondary roads - Solid fill, warm brown
#A85A22(width 3). The grounding mid-tone. - Streets - Solid fill, tan
#C98A4A(width 1.5). The fine warm mesh that fills the frame; ease it back if the old town gets too dense.
The palette is balanced to stay warm and harmonious. If you recolour one road, keep it in the orange-mustard-brown family so the whole map holds its vintage feel rather than turning bright.
Step 3 - Export
- UV / sublimation: export the high-res PNG (4096 px). Keep the Background toggle on so the cream base prints as a solid field, or turn it off for a transparent background to let a natural wood blank become the "paper".
- Poster: same high-res PNG, sized to your paper. The square 1:1 frame suits a 12x12 or 20x20 print.
- Laser (optional): export the per-layer SVG ZIP, ignore the colours, and engrave the road network as a single tonal pass.
Choose Your Build Method
UV print / sublimation
- Export the high-res PNG. Turn the Background off and print onto a natural wood blank to let the grain show through as the "paper" - a perfect match for the warm palette - or leave it on for a full cream field.
- For sublimation, mirror the image and press onto a wood, hardboard, or aluminium blank per its spec. Warm-toned blanks deepen the vintage feel.
- On a UV flatbed, print straight onto wood, acrylic, or hardboard. A white underbase keeps the mustard and orange opaque on darker stock.
- A matte or satin finish suits the faded-poster look better than high gloss.
Poster / paper print
- Send the high-res PNG to a photo lab or print on matte or lightly textured art paper - texture sells the vintage feel.
- Frame in warm wood or brass to complete the 70s mood.
- The 1:1 square crop is set for you - keep it square, or re-export after switching the aspect ratio for a portrait travel-poster format.
Make It Yours
- Old European cities suit this best: Amsterdam, Vienna, Bruges, Lisbon - tight historic street grids give the warm mesh its richness.
- Print on natural wood with the background off so the grain becomes the paper - the single most 70s-feeling variant.
- Warm the Land base toward parchment
#EFD9A8for an even more aged, sun-faded look. - Recolour the water from avocado to a teal-green
#5C8A6Afor a slightly cooler retro variant. - Add the city name and coordinates in a chunky 70s typeface under the map for a complete travel-poster look.
- Print large (20x20 square) framed in warm wood as a statement piece, or small as a set of warm-toned coasters.
- Turn down the Streets layer for a bolder, more graphic version that leans on the burnt-orange and mustard arteries.
New free tools, every month.
New laser cutting tools, what's coming next, and features we're building right now. Only MyLaserTools.com news. No spam, ever.
© 2026 MyLaserTools.com. All rights reserved.