Making a soft-pastel heart street map with the Pastel Candy Heart Map preset
Difficulty: Easy. Time: under an hour of design time, then your printer's run. Best method: sublimation / full-colour print (it's a soft-colour, heart-shaped design). A laser version works as an engraved or cut heart keepsake.
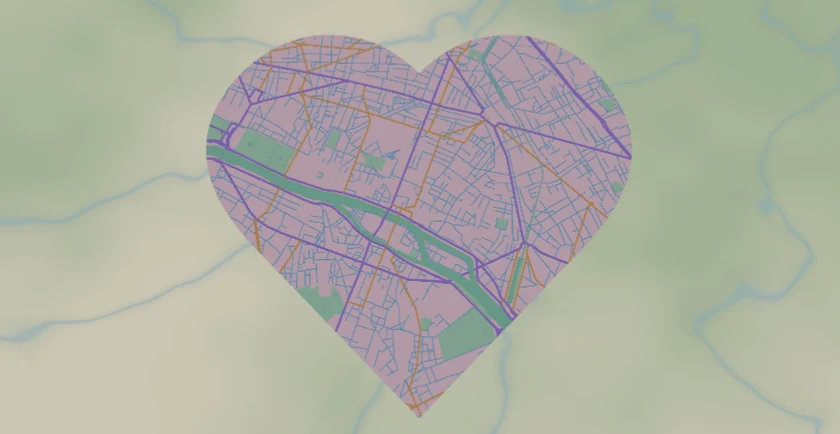
This is a print-first sweetheart of a preset. The Pastel Candy Heart Map lays the Paris street network into a soft candy palette - mint-green water, peach and lilac roads, sky-blue side streets - on a bright cream base, and clips the whole thing to a heart. Everything is solid colour fill, so the charm is entirely in the gentle palette and the heart silhouette. It's built for sublimation, photo prints and gift items rather than for splitting into cut layers.
Paris is a lovely fit: the dense radial street pattern and the Seine sweeping through give the heart a busy, romantic texture from edge to edge. Any city someone loves works just as well - a hometown, a first-date city, a honeymoon trip.
What You'll Need
Sublimation / UV print
- The exported high-res PNG (4096 px)
- Sublimation setup with a coated blank (mug, slate, aluminium, ceramic ornament) or a UV flatbed
- A light or white substrate - the cream base and pastels read true on white
Photo / paper print
- The exported high-res PNG sent to a photo lab or printed on matte photo paper
- A frame or card blank; pastels suit a soft white or blush mount
Laser (optional, heart keepsake)
- 3 mm laser-grade plywood or a light acrylic for an engraved/cut heart
- Any diode or CO2 laser
- Note: the pastel colour won't survive a laser - use it for a monochrome engraved heart
Step 1 - Start from the preset
Open the Pastel Candy Heart Map preset. It opens on Paris at zoom 13 with the export shape set to a heart, so the street grid is already clipped into the silhouette. Pan so the densest, prettiest part of the city - or the spot that matters to the recipient - sits in the centre of the heart, since the heart crops the edges. Zoom in to 13.5-14 for a tighter, more detailed heart; out to 12.5 to fit more of the river and city shape.
Step 2 - Tune the layers
The preset is a single layer group, "Candy city", and every feature is Solid fill - there are no cut or score layers, so the palette is what you tune:
- Land - Solid fill, bright cream
#FFF7FB. The soft base the pastels sit on. Keep it near-white for the candy look, or warm it slightly for a creamier tone. - Water - Solid fill, mint green
#9FE7CE. The Seine and ponds become a sweet mint ribbon - one of the strongest shapes in the heart. - Park / landuse - Solid fill, soft mint
#C6F0D8. Green spaces add gentle blocks of colour. - Motorway - Solid fill, candy pink
#FF8FB0, the boldest line (width 6). - Primary roads - Solid fill, lilac
#B99CFF(width 4). - Secondary roads - Solid fill, peach
#FFC078(width 3). - Streets - Solid fill, sky blue
#8FD0FF(width 1.5). The fine pastel mesh that fills the heart; ease it back if the centre gets too busy.
The palette is tuned to stay soft and harmonious. If you recolour one road, keep the saturation low so the whole heart stays in the candy register rather than going bright and harsh.
Step 3 - Export
- Sublimation / UV: export the high-res PNG (4096 px). Keep the Background toggle on so the cream base prints as a solid field behind the heart, or turn it off for a transparent background so the heart drops cleanly onto a coloured blank or card.
- Photo print: same high-res PNG, sized to your card or frame.
- Laser (optional): export the per-layer SVG ZIP. The heart export shape gives you a ready-made cut outline; engrave the road network inside it.
Choose Your Build Method
Sublimation / UV print
- Export the high-res PNG. For a printed keepsake on a coloured product, turn the Background off so only the heart prints; for a full cream tile, leave it on.
- For sublimation, mirror the image and press onto a white or light coated blank per its spec - a ceramic heart ornament, slate coaster, or aluminium photo panel all suit the soft palette.
- Pastels read truest on white substrates; on coloured stock the cream base shifts, so prefer white or very light blanks.
- On a UV flatbed, print onto a light hardboard, acrylic, or wood blank. A white underbase keeps the pastels from going translucent.
Photo / paper print
- Send the high-res PNG to a photo lab or print on matte or satin photo paper - matte flatters pastels.
- Turn the heart into a greeting card or framed gift; a blush or soft-white mount keeps the candy feel.
- The heart crop is already set - re-frame your view so the meaningful spot sits centred before exporting, since the silhouette trims the corners.
Make It Yours
- Perfect for romantic gifts: a couple's city, a wedding venue town, the place you met - the heart shape does the emotional work.
- Swap the city to anywhere meaningful; dense radial cities like Paris, Vienna or Amsterdam fill the heart beautifully.
- Warm the cream base toward blush
#FFE9F0for an even softer, more rose-tinted candy look. - Recolour the water to pale lilac or peach to match a nursery or wedding palette.
- Print small on a ceramic heart ornament for a hangable keepsake, or large as a framed print for an anniversary gift.
- Export with a transparent background and layer the heart over a watercolour wash or a name and date for a personalised card.
- Turn down the Streets layer for a cleaner, more minimal pastel heart that leans on just the bold pink and lilac lines.
New free tools, every month.
New laser cutting tools, what's coming next, and features we're building right now. Only MyLaserTools.com news. No spam, ever.
© 2026 MyLaserTools.com. All rights reserved.