
Mapping the after-dark city with the Nightlife Map preset
Difficulty: Easy. Time: under an hour of design time, then your printer's run. Best method: full-colour / UV print (the neon-on-dark look is built for print). A laser version works only as a monochrome engrave and loses the neon colour.
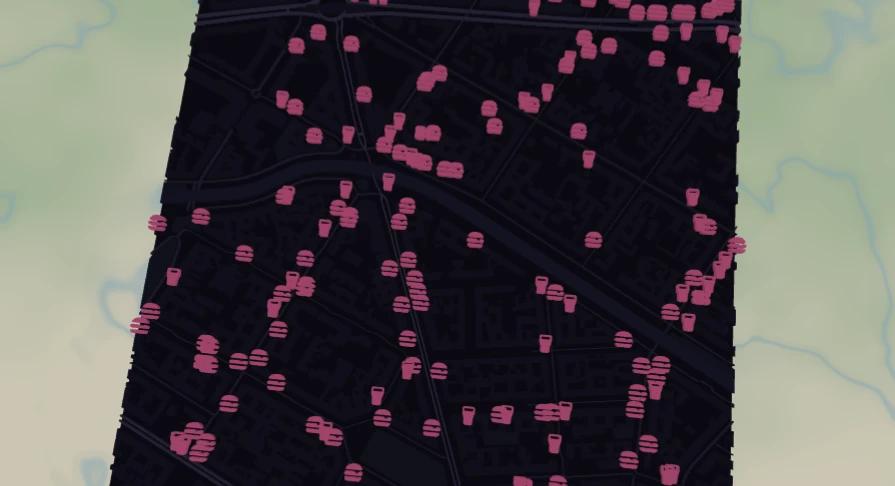
This is a print-first preset built around one thing: clustering. The Nightlife Map centres on Kreuzberg in Berlin at close zoom over a deep midnight street grid, then layers three kinds of nightlife on top - bars and pubs, restaurants, and theatres and cinemas - pulled live from OpenStreetMap. Because the points sit so close together in a busy district, clustering merges neighbouring venues of the same category into a single neon-pink icon, so a crowded corner stays a clean symbol instead of a knot of overlapping ones. Dense nightlife blocks still read as denser fields of icons; quiet streets show just a scattered few or none at all.
The result is less a street map and more a glowing after-dark map of where the city goes out: at a glance you can read which quarters are packed. The square frame keeps the busiest run of icons dead centre, floating over the near-black indigo grid. It's made for premium bar-district posters, venue gifts and city-nightlife wall pieces - recolour the neon to a brand or a mood and add the city name and a date to make it yours.
What You'll Need
UV print (recommended)
- The exported high-res PNG (4096 px)
- UV flatbed printer, ideally with a white underbase so the neon pink stays vivid on dark stock
- Dark acrylic sheets, black hardboard or dark wood - the near-black grid is the whole look, so start dark rather than white
Poster / paper print
- The exported high-res PNG sent to a photo lab or printed on a heavy matte or satin stock
- A dark or black frame; the neon reads brightest against a deep surround
Laser (optional, monochrome)
- A light wood or coated tile that engraves with contrast
- Any diode or CO2 laser
- Note: the neon won't survive a laser - the dark base becomes engrave and you lose the pink glow, so treat it as a monochrome venue map
Step 1 - Start from the preset
Open the Nightlife Map preset. It opens on Kreuzberg in Berlin at zoom 14.2 in a square (1:1) frame, with the neon venue icons already glowing over the midnight grid. One thing to know up front: the POI markers come from OpenStreetMap and only load at close zoom - they're fetched from zoom-14 tiles, so if you zoom out too far they vanish and you're left with just the dark base. Keep it around zoom 14 to 15 so the venues stay on the map. Pan so the busiest run of icons sits in the middle of the frame; that dense cluster is the anchor of the whole design.
Step 2 - Understand the two layers
The preset stacks two layer groups. The first, "Midnight base", is the dark city grid - all solid fill and line, in a tight near-black indigo palette:
- Land background - Solid fill, near-black indigo
#131022. The deep base the whole design glows against. - Water - Solid fill, dark violet
#1E1B3A. The Landwehr canal and any water read as a slightly lifted band. - Parks - Solid fill,
#1A1B2E. Green space, kept barely brighter than the land so it stays quiet. - Buildings - Solid fill,
#1C1930. The block shapes of the district, a hair above the background. - Primary roads - Solid line,
#4A4370(width 2.6). The brightest lines, tracing the main routes. - Secondary roads - Solid line,
#3B3559(width 1.8). The connecting streets. - Streets - Solid line,
#2C2745(width 1.1). The fine local mesh, the dimmest lines of the grid.
The colours climb in tiny steps from land to primary road, so the grid reads as a subtle glowing lattice rather than a hard map. The second group, "Nightlife clusters", is the star and gets its own step below.
Step 3 - The POI layer and clustering
"Nightlife clusters" is a Points of Interest layer in symbols mode with clustering switched on. It pulls three categories together - Bars & Pubs, Restaurants, and Theatres & Cinemas - straight from OpenStreetMap. Here's how the clustering works and why it makes the map:
- Clustering merges nearby venues of the same category into one icon. It works per category, so a cluster only ever groups markers of one kind. When several bars sit close together, instead of a knot of overlapping icons you get a single neon-pink icon drawn with that category's own symbol. Sparse streets show individual icons; a heaving nightlife block reads as a denser field of them.
- The Cluster Radius slider controls how aggressively they merge. This preset uses a radius of 60. Turn it down for more, separate icons that hug individual corners; turn it up for fewer, merged icons that stand in for whole streets. It's a decluttering dial, not a counting one - a small radius reads like a detailed scatter, a big radius keeps a busy area clean and readable.
- Each category has its own colour and symbol. The layer ships with a single default neon pink
#FF2D95that applies to any category left on its default, and each category can be recoloured on its own. Every category keeps its own default pictogram, so a merged icon still reads as the kind of venue it stands for, and it all exports cleanly to SVG and print at any size. - Marker size is set to 24; nudge it up for chunkier icons or down for a finer, more scattered field.
You can edit this layer freely. Add or remove categories (cafes and clubs live under the bars family), change the neon colour to anything you like, adjust the marker size or cluster radius, or turn clustering off entirely to show every individual venue icon. Just remember to keep the zoom close so the OpenStreetMap POIs stay loaded.
Step 4 - Export
- UV print (best): export the high-res PNG (4096 px). Keep the Background toggle on so the midnight indigo prints as a solid field - it's the whole point of the look. Pair it with a white underbase on dark stock so the neon pink genuinely glows.
- Poster: same high-res PNG, sized to your paper. The square 1:1 frame suits a 12x12 or 20x20 print.
- Laser (optional): export the per-layer SVG ZIP. The neon colour won't carry, so treat the dark base as engrave and the clustered venue icons as a second engrave pass for a monochrome venue map.
Choose Your Build Method
UV print
- Export the high-res PNG with the Background left on so the deep indigo prints as a solid field.
- Print onto dark stock - black or dark acrylic, dark wood or black hardboard - so the near-black grid sits into the material and the neon lifts off it.
- Lay down a white underbase under the pink venue icons first. Neon pink over white over dark acrylic is what makes it glow; skip the underbase and the pink goes muddy on dark stock.
- A satin or gloss finish suits the after-dark look - gloss makes the neon pink read brightest.
- Mount the finished dark acrylic proud of a backer with a strip of 3M tape for a floating, layered wall piece.
Poster / paper print
- Send the high-res PNG to a photo lab or print on a heavy matte or satin stock for a framed nightlife poster.
- Frame in a dark or black frame to complete the neon-on-dark look; a light frame fights the design.
- The 1:1 square crop is set for you - keep it square, or re-export after switching the aspect ratio to a portrait format with room for the city name and a bar-crawl date below.
Make It Yours
- Centre it on your own city's bar district - Shoreditch in London, the Marais in Paris, Wicker Park in Chicago - any dense nightlife quarter turns into a glowing field of clustered icons.
- Recolour the neon to match a venue's brand or a mood: cyan for a cool club look, acid green for something electric, or warm amber for a speakeasy feel.
- Widen the Cluster Radius for a bold, decluttered read of the whole area - or turn clustering off entirely to show every single bar, restaurant and theatre as its own icon.
- Add just Bars & Pubs to the POI layer for a focused pub-crawl map, and drop the restaurants and theatres.
- Print on dark acrylic with a white underbase so the pink genuinely glows off the near-black grid - the single best way to make this piece pop.
- Add the city name and a bar-crawl date under the map in a bold modern typeface for a night-out keepsake.
- Nudge the marker size and cluster radius together - big markers with a wide radius for a punchy, clean poster, small markers with a tight radius for a detailed scatter.
New free tools, every month.
New laser cutting tools, what's coming next, and features we're building right now. Only MyLaserTools.com news. No spam, ever.
© 2026 MyLaserTools.com. All rights reserved.