Making an acrylic LED night light with the Acrylic Night Light Map preset
Difficulty: Beginner–Intermediate · Time: 30–60 minutes plus the LED base · Methods, ranked: 1) Laser engrave on clear acrylic + LED base (the intended build), 2) cut the street network through the acrylic for a stencil-style lamp (advanced, fragile), 3) engrave without the base as a windowsill sun-catcher.
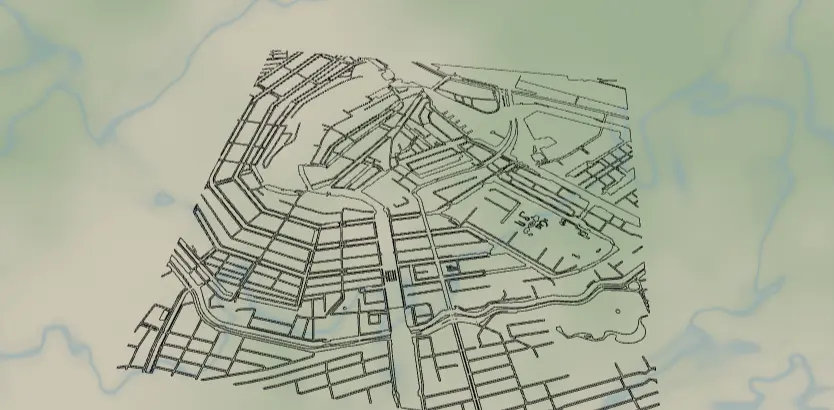
Engrave a city's street network into clear acrylic, drop it into an LED base, and the streets light up from within - the frosted engraving catches the edge-lit glow while the clear acrylic stays invisible. This preset ships set up on Amsterdam (canals everywhere, which glow beautifully) and produces a connected street design with a border frame sized for the standard rectangular night-light bases you can buy for a few dollars.
What You'll Need
Laser engrave + LED base (recommended)
- Clear cast acrylic, 3 mm (cast frosts whiter than extruded when engraved - worth seeking out), sized to your base slot, typically 100–150 mm wide
- LED night-light base with a 3 mm slot - USB or battery, warm white or RGB
- Laser engraver (diode lasers need the acrylic's masking on or a coat of dry-erase marker to engrave clear material; CO2 engraves clear acrylic directly)
- Isopropyl alcohol + microfiber for cleanup
Step 1 - Start from the preset
Open the Acrylic Night Light Map preset. It loads on Amsterdam at zoom 13.6 with a square frame and a black border. Search for your city.
Framing tips:
- Zoom 13–14 gives the dense, intricate street texture that looks best lit - this is one preset where more detail glows better.
- Canal/river cities are the stars: the preset fills water solid, so harbors and canals become big luminous shapes anchoring the design.
- Remember the bottom ~10 mm of the acrylic sits inside the base slot - keep the most interesting geography in the upper two-thirds.
Step 2 - Tune the layers
One layer group, Engraved streets, and it's in Cut mode (outline: true, padding 10) - every street is buffered into a contour and merged with the border frame into one connected shape. Don't let the mode name throw you: you're going to engrave this filled artwork, not cut it. Engraving the filled contours gives wide frosted streets that pipe light far better than hairline scores. (Cut mode also means you could cut it - see Method 2.)
Features:
- Motorway (width 4), primary (3), secondary (2), neighborhood streets (2) - all black. The flat 2/2 on secondary + street keeps the residential grid present without disappearing; bump street to 3 if your city is sparse.
- Water - solid black fill. Two things to know: large solid water areas mean long raster engrave times, and a big frosted harbor will out-glow the fine streets on the LED base. For canal cities it's magic; for a city on a huge bay, consider removing the water feature or cropping the frame mostly to land so the streets stay the heroes.
The border frame engraves as a clean rectangle around everything and visually "contains" the glow - keep it.
Step 3 - Export
In the export modal:
- Download the per-layer SVG (one layer, so combined = same thing) for engraving, and note the outer rectangle doubles as your cut line for the blank.
- Small-polygon cleanup on - micro street fragments just add engrave time without adding glow.
- Mounting holes: usually none - the base holds the panel. If you're building the sun-catcher variant instead, enable the Hanger hole at top-center for hanging in a window.
- If you want a quick visual mock, grab the high-res PNG too - inverted in any editor it previews roughly how the lit panel will read.
Choose Your Build Method
Engrave + LED base
- Measure your base slot and cut the acrylic blank: the SVG's frame width plus a tab extending ~10 mm below the frame to sit in the slot. Many makers just make the panel 10 mm taller and let the bottom border ride inside the base.
- Mirror the artwork and engrave the back face of the panel - the design looks correct from the front and the frosting sits closest to the viewer's light path. Leave the front masking on while engraving the back.
- Engrave settings: moderate power, high speed, one pass - you want a uniform frost, not deep gouging. Run a small test square on the corner of your sheet first.
- Cut the outer rectangle (and slot tab) as the final pass.
- Peel the masking, clean with isopropyl - fingerprints glow under LEDs, annoyingly.
- Seat the panel in the LED base and light it up. Warm white flatters wood-toned rooms; RGB bases let the buyer pick.
Cut-through stencil lamp (advanced)
Because the layer is genuinely Cut mode, the export is one connected piece you can cut entirely through 3 mm acrylic: the streets become voids that blast light. It's dramatic but delicate - thin street ribbons of acrylic remain between the voids.
- Cut (don't engrave) the SVG from black or frosted acrylic.
- Back it with a second plain clear panel in the same base slot (or glue 1 mm clear behind it) so the lamp is sturdy and the light diffuses through the cutouts.
Make It Yours
- Engrave a name and coordinates along the bottom border - it sits right above the base, like a title plate.
- Anniversary lamp: center on the proposal spot and engrave the date in a corner of the frame.
- Try the circle export shape with a round LED base for a "city in a porthole" look.
- Color cheat: tint the glow per-city with an RGB base preset - orange for Amsterdam, teal for coastal towns.
- Stack two panels in a double-slot base: streets on the front panel, water only on the back panel, lit in two colors.
- Skip the base entirely, add the hanger hole, and hang it in a sunny window as a frosted sun-catcher.
- Make a "cities I've lived in" set of slim panels for one multi-slot base, swappable by mood.
New free tools, every month.
New laser cutting tools, what's coming next, and features we're building right now. Only MyLaserTools.com news. No spam, ever.
© 2026 MyLaserTools.com. All rights reserved.