Making a glowing night-city panel with the Neon Night Map preset
Difficulty: easy-moderate (registration on dark substrates takes care). Time: 30–60 minutes for a print, 2–4 hours for a 3D plaque. Best methods, in order: UV printing on black acrylic, 3D printed plaque, sublimation on white poly panels, laser engraving (with caveats).
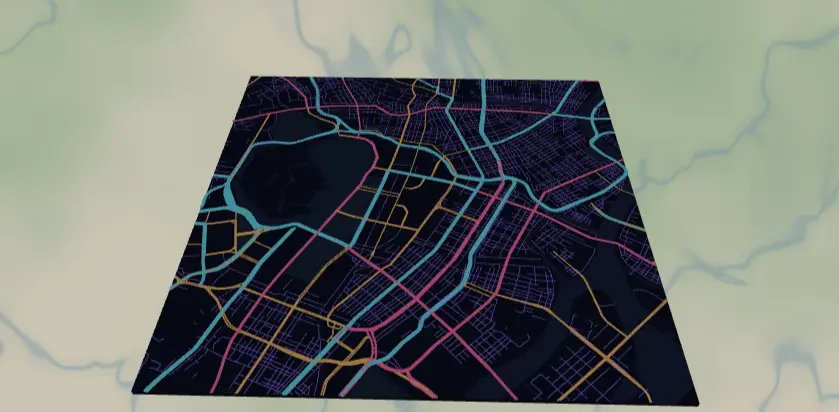
This preset renders a dense city's road network as neon - cyan motorways, hot-pink primaries, amber secondaries, and violet side streets - over a deep navy night. It's built for UV printing on black acrylic, where you hide the background and let the gloss black substrate be the night sky. The result looks like a long-exposure photo of city traffic.
What You'll Need
- UV printing: flatbed UV printer, gloss black cast acrylic (3 mm) or black aluminum composite panel, isopropyl alcohol for prep, jig or bed registration marks
- Sublimation: sublimation printer + paper, white poly-coated aluminum panel or hardboard (sublimation can't print onto dark blanks - the navy background has to come from ink), heat press, heat tape, butcher paper
- Laser engraving: CO2 or diode laser, black-coated anodized aluminum or two-tone laserable acrylic (engrave-to-reveal materials suit this design far better than wood)
- 3D printing: multi-color printer, filaments in navy plus 3–4 bright "neon" colors (silk or fluorescent PLA sells the look)
Step 1 - Start from the preset
Open the Neon Night Map preset. It loads Tokyo at zoom 13.3, square crop - close enough that the full road hierarchy fills the frame in layers of color. This preset lives and dies on road density: search for a city with a thick downtown grid (Tokyo, Seoul, Mexico City, Manhattan, São Paulo) and center on the densest interchange you can find. Stay around zoom 13–13.7; zoom out much past 13 and the width-1 violet streets collapse into haze, zoom in past 14 and you lose the motorway structure that provides the cyan accents.
Step 2 - Tune the layers
One Solid layer group, Night city:
land-#0B1026deep navy. This is the layer you'll toggle off for black-substrate prints.water#101A3DandlandusePark#11233A- barely-lighter pockets of dark that add depth on backlit or white-substrate prints. On black acrylic with the background hidden they won't appear at all, which is fine.roadsMotorway#00E5FFwidth 5 - the cyan arteries.roadsPrimary#FF2D95width 3 - hot pink.roadsSecondary#FFB300width 2 - amber.roadsStreet#7C4DFFwidth 1 - violet capillaries. Violet on navy is the lowest-contrast pair in the preset; if your print method softens edges (sublimation especially), bump this to width 1.5 or brighten it to#9E7BFF.
All widths are filled ribbons, so the glow layering you see on screen is real geometry in every export.
Step 3 - Export
- UV on black acrylic: toggle Background off in the export modal and grab the 4096 px PNG - you get transparent night, neon roads only. Also hide
waterandlandusePark(they'd print as faint dark rectangles on an already-black panel). - Sublimation / white substrates: keep the background on; the navy prints as ink.
- Laser: export per-layer SVG ZIP so you can engrave road tiers at different settings.
- 3D: export the 3MF with all layers on.
- Corner holes in the Mounting holes options turn the panel into a standoff-mounted wall piece - anodized standoff spacers in a bright colour suit this design perfectly. Skip small-polygon cleanup; there are no tiny fills here.
Choose Your Build Method
UV printing
- Export the transparent PNG (Background, water, and parks toggled off).
- In the RIP, place the art on a black acrylic panel layout; no white underbase under the roads gives a translucent stained-glass glow, a white underbase gives opaque punchy neon - run a small swatch of both.
- Wipe the acrylic with IPA, seat it against your bed jig, and verify origin with a test outline.
- Print; if your RIP supports it, add a gloss varnish pass over the roads for extra shine.
Sublimation
- Keep the navy background ON - your blank must be white poly-coated, and the ink supplies the night.
- Print mirrored on sublimation paper at final size.
- Tape to a white aluminum sublimation panel, sandwich in butcher paper.
- Press with the settings recommended for your material, paper, and inks (metal panels usually press shorter than hardboard).
- Peel hot. Expect the width-1 violet streets to soften slightly - that reads as glow bloom and honestly helps the effect.
Make It Yours
- Dense-grid cities are the whole game: try Seoul, Bangkok, Mexico City, or Los Angeles freeway knots.
- Synthwave swap: motorways
#FF2D95, primaries#00E5FF, streets#FF6EC7- sunset-grid vibes on the same navy. - Monochrome glow: set all four road tiers to
#00E5FFwith widths 5/3/2/1 for a single-color circuit-board look. - Toggle water back on at
#1B2B5Efor coastal cities so harbors read as negative space (Hong Kong, Sydney). - Print on clear acrylic with no underbase and edge-light it with an LED strip for a real neon sign effect.
- Add a route layer in white
#FFFFFFtracing a night out - bar crawl, marathon course, first-date walk. - Switch the export shape to circle and add a Hanger hole for a neon city ornament cut from black acrylic.
- Pair with the Figure Ground preset of the same city as a day/night diptych on matching panels.
New free tools, every month.
New laser cutting tools, what's coming next, and features we're building right now. Only MyLaserTools.com news. No spam, ever.
© 2026 MyLaserTools.com. All rights reserved.