Making a sew-on map patch with the Leatherette Map Patch preset
Difficulty: Beginner · Time: 15–30 minutes per patch (plus hand-stitching) · Methods, ranked: 1) Laser engrave + cut on leatherette (the intended build), 2) the same file on 3 mm wood or anodized aluminum blanks for a stiffer badge. (Vinyl and sublimation don't suit leatherette; skip them here.)
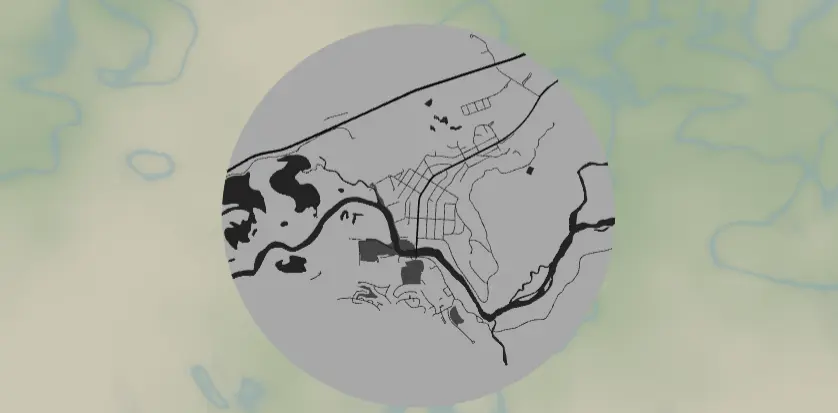
A round leatherette patch engraved with the street map of a favorite trailhead town, ski hill, or hometown - stitched onto a backpack, hat, or jacket. The preset is a high-contrast monochrome design set up on Banff, and it pairs with the export modal's Stitch holes option, which adds evenly spaced cut holes around the rim so sewing the patch on is painless and even. These are fast to make, cheap in materials, and a best-seller format for outdoor towns.
What You'll Need
Laser on leatherette (recommended)
- Laserable leatherette / faux leather sheets (the two-tone kind sold for laser work: black-over-silver, brown-over-tan, etc.) - must be PU-based and sold as laser-safe; never laser genuine PVC "vinyl" leather
- Laser cutter (diode or CO2)
- Heavy thread (waxed polyester or embroidery floss) + a blunt-tip needle, and the garment or pack to host the patch
- Optional: fabric glue or heat-seal backing to tack the patch before stitching
Step 1 - Start from the preset
Open the Leatherette Map Patch preset. It loads on Banff at zoom 13.6 in a banner shape - a wide rounded ribbon at mountain-town scale, where the Bow River and the compact street grid both fit. Search for your own town.
Framing tips:
- Zoom 13–14.5: patches are small (60–80 mm), so favor a tight, recognizable core over a sprawling map.
- A river, lakeshore, or distinctive main drag anchors the design - the preset fills water dark, which reads great engraved.
- There's no border frame on this preset - the map runs full-bleed to the banner edge - so park the most important detail away from the rim where the stitch holes will live.
Step 2 - Tune the layers
One layer group, Patch engraving (Solid mode), tuned as a grayscale engraving map:
- Land - white (
#FFFFFF): untouched leatherette surface. - Water - dark grey (
#3B3B3B): deep engrave; on two-tone leatherette this exposes the contrast core, so rivers and lakes pop hardest. - Parks - mid grey (
#6B6B6B): lighter engrave for a subtle third tone. - Roads - motorway (width 5), primary (4), secondary (3) near-black
#1A1A1A, neighborhood streets (width 2)#2E2E2E. Generous widths on purpose: at 70 mm patch size, skinny lines fuzz out on textured leatherette. Resist the urge to thin them.
If your laser software engraves by grayscale power mapping, those four tones become four depths. If it's binary engrave/skip, everything non-white engraves the same - still looks great, just flatter; you can delete the parks feature in that case to reduce noise.
Step 3 - Export
In the export modal:
- Enable Stitch holes - the headline option for this preset. It rings the banner with evenly spaced small cut circles for sewing. Set the hole diameter around 1–1.5 mm and a spacing that gives you a hole every 5–8 mm; preview until the rhythm looks right.
- Download the per-layer SVG: the map engraves, the outer banner outline and the stitch holes cut.
- Small-polygon cleanup on - tiny street fragments don't survive at patch scale anyway.
- Skip the hanger/corner hole modes (only one mounting mode applies at a time, and stitch is the right one here).
Choose Your Build Method
Laser engrave + cut on leatherette
- Set the SVG to final size - 70 mm is the classic patch diameter; 60 mm for hats, 90 mm for pack lids.
- Pin the leatherette flat (it curls): magnets, tape at the corners, or a light tack-down spray on a spoilboard.
- Engrave pass first: low power, high speed - leatherette engraves fast and scorches if pushed. Test a 10 mm square on scrap to dial in the tone.
- Cut pass: the banner perimeter and all stitch holes. Leatherette cuts in one light pass; too much power melts the hole edges.
- Wipe with a barely damp cloth to lift soot - don't soak it.
- Stitch it on: a simple whip stitch or running stitch through the pre-cut holes, every hole, with contrasting waxed thread. The even spacing does the neat-work for you.
Rigid badge on wood or aluminum
The same export works on 3 mm laser-grade plywood or laserable anodized aluminum blanks for a stiffer badge - keep the stitch holes and lace it to a pack with paracord, or skip them and glue on a pin back.
- Engrave the map (aluminum: high speed, one pass strips the anodize to bright silver).
- Cut or use a pre-cut round blank.
Make It Yours
- Add a tiny heart or star at "the spot" - the campsite, the summit trailhead - by zooming so it sits dead center.
- Trail town series: same 70 mm format, every town on your thru-hike, stitched in a row down a pack strap.
- Two-tone leatherette color play: black/silver for urban maps, brown/tan for mountain towns.
- Engrave the town name and elevation in a curve along the bottom rim (keep it inside the stitch-hole ring).
- Swap the banner for the circle or hexagon export shape - stitch holes follow whatever edge you pick, and hexes tile nicely on a jacket back.
- Make a key fob variant: shrink to 45 mm, switch the mounting mode to a single Hanger hole, and add a rivet and strap or a snap clip.
- Sell blanks-plus-thread kits: patch, needle, pre-cut thread length - the stitch holes make it a 15-minute customer craft.
New free tools, every month.
New laser cutting tools, what's coming next, and features we're building right now. Only MyLaserTools.com news. No spam, ever.
© 2026 MyLaserTools.com. All rights reserved.