Two-layer toppers with the Layered Cake Topper (Single Stake)
Difficulty: intermediate. Time: 20 to 30 minutes of design and cutting, plus assembly. Best methods, in order: laser cutting, 3D printing.
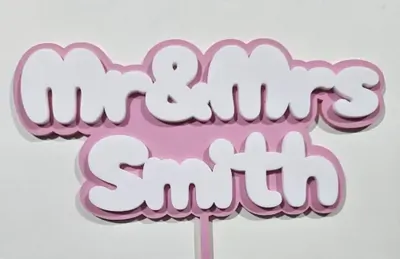
The toppers you see in bakery windows are almost never one layer: the script sits on a slightly larger outline backer in a contrasting material, which makes the text pop and triples its strength. This tool generates both layers in perfect registration, text layer and outline layer, with the single stake built into the backer.
Cut the outline from glitter acrylic and the text from solid color (or two wood tones), bond them, and the result looks premium because it is exactly how the premium ones are made. For multi-material 3D printing, the layers export together as a multi-layer 3MF.
What You'll Need
- Laser cutting: laser cutter, two contrasting 3 mm sheets (acrylic in glitter plus solid is the classic pairing, or laser-grade plywood tones), 3M tape (467 for acrylic) to bond the layers
- 3D printing: an FDM printer, two filament colors (multi-material unit or a manual color swap)
Step 1 - Type your text
Open the tool and enter your phrase. Pick a script font and set Font Size; the tool generates the connected text layer and grows the outline layer around it automatically. Add a symbol if you like and scale it with Symbol size.
Step 2 - Position layers and stake
- Text Width sets the finished size; 130 to 160 mm suits an 8 inch cake.
- Text Offset X/Y shifts the text within its outline backer.
- Stake Width and Stake Height size the pick; the stake belongs to the outline layer, so the backer carries the load.
- Stake Offset X/Y slides the stake under the design's center of mass so the topper stands straight.
Step 3 - Export
Download the SVG (both layers, color-coded for separate cutting) or a multi-layer STL/3MF for printing.
Choose Your Build Method
Cutting and bonding
- Import the SVG and separate the two layers by color into two jobs.
- Cut the outline layer (with stake) from your statement material, like gold glitter acrylic.
- Cut the text layer from the contrast material, solid white or black acrylic, or a darker wood.
- Apply 3M 467 tape to the back of the text layer before peeling its protective film, then weed the tape to the letter shapes.
- Register the text onto the outline; the matching silhouettes self-align, then press firmly.
- Avoid liquid glue on acrylic toppers; it fogs glitter faces, which is exactly why tape is the trade standard.
Make It Yours
- Gold glitter outline with white script, the bakery-window standard.
- Walnut outline with maple text for a rustic wedding cake.
- Black acrylic text on a frosted clear outline for a modern monochrome cake.
- Birthday set: matching topper and cupcake-size minis from the same design.
- Mirror silver outline under deep navy text for a milestone anniversary.
- Swap the symbol per event: hearts for showers, stars for graduations.
- Keep one demo topper in each colorway for your market stall order book.
- Need a wider phrase? The two-stake version of this tool spans bigger cakes.
New free tools, every month.
New laser cutting tools, what's coming next, and features we're building right now. Only MyLaserTools.com news. No spam, ever.
© 2026 MyLaserTools.com. All rights reserved.