
Making an anniversary keepsake with the Heart Keepsake Map preset
Difficulty: easy. Time: 30–45 minutes printed, 1–2 hours engraved-and-cut, 2–3 hours as a 3D plaque. Best methods, in order: UV printing on wood or acrylic, laser engrave-and-cut (the heart outline begs to be cut), sublimation on heart blanks, 3D printed plaque/ornament.
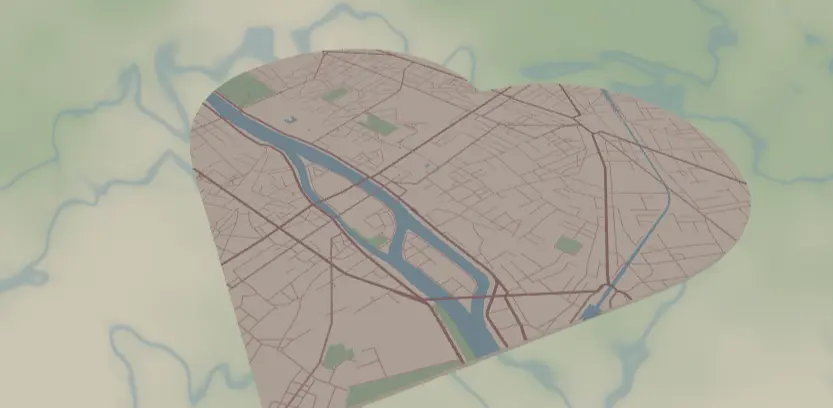
This preset crops the map of the place you met into a heart: blush-rose roads on warm cream, sage parks, and soft blue water, loaded on Paris because of course it is. It's the toolkit's purpose-built romance piece - anniversary gifts, wedding favors, Valentine's ornaments, engagement keepsakes.
What You'll Need
- UV printing: flatbed UV printer, light wood or white/clear acrylic; pre-cut heart blanks if you have them, or print-then-cut on the laser
- Sublimation: sublimation printer + paper, heart-shaped poly-coated hardboard or ceramic ornament blanks (widely available), heat press, heat tape, butcher paper
- Laser engraving: diode or CO2 laser, 3 mm light laser-grade plywood or pastel acrylic - this method both engraves the map and cuts the heart in one job
- 3D printing: multi-color printer; cream, blush, sage, and soft blue filaments
Step 1 - Start from the preset
Open the Heart Keepsake Map preset. It loads Paris at zoom 13.2 with the heart export shape already active - the frame in the preview is the actual cut/crop. Search the city where it happened, then do the thing that makes this gift land: position the exact spot - the bar, the bench, the venue - near the heart's visual center, slightly above the point. Zoom 13–13.5 keeps a full neighborhood of street texture inside the lobes; for a small town drop to 14 so the streets still fill the shape. Watch the heart's notch and point: don't let a featureless patch (open water, empty park) occupy either, since they're the shape's focal zones.
Step 2 - Tune the layers
One Solid layer group, Keepsake map:
land-#FAF1E9warm cream.water-#A8C7D8powder blue; rivers curve beautifully through the heart shape.landusePark-#CBDCC2sage.- Roads, blush ramp:
roadsMotorway#C98B8Bwidth 4,roadsPrimary#C98B8Bwidth 3,roadsSecondary#D6A4A4width 2,roadsStreet#E0B9B9width 1.
The palette is intentionally soft, which means two method-specific tweaks are worth knowing. For sublimation, the width-1 #E0B9B9 streets against #FAF1E9 cream are right at the wash-out line - bump streets to #D6A4A4 and width 1.5 if the fine grid matters to your composition. For laser engraving, the whole blush range converts to light gray; darken all road tiers toward dusty rose #8B5A5A before exporting an engrave file or the burn will be faint. For UV and 3D, print it exactly as designed.
Step 3 - Export
- UV / sublimation: 4096 px PNG - the heart crop comes through with a transparent surround, so it drops cleanly onto blanks. Toggle Background off as well when printing on wood so the grain becomes the cream.
- Laser: combined SVG - it includes the heart outline for cutting plus the road/water/park fills for engraving.
- 3D: 3MF prints as a heart-shaped plaque directly.
- Hanger hole is the headline option here: enabled, the heart becomes an ornament - wedding favors, first-Christmas-married, Valentine's. The heart icon overlay is redundant on a heart crop; use the compass or nothing. Cleanup is rarely needed at this zoom.
Choose Your Build Method
UV printing
- Export the transparent-surround PNG (Background off for wood, on for white blanks).
- In the RIP, align the heart artwork over your blank - pre-cut heart blanks need a jig; flat panels get cut after.
- Print color direct on wood (no underbase, let grain through) or with underbase on clear acrylic.
- If printing on a flat panel, cut the heart outline afterward on the laser using the SVG's outline path so print and cut share geometry.
Sublimation
- Print mirrored at final size - heart-shaped sublimation ornament blanks are standard catalog items, so match the blank's dimensions.
- Consider the street bump from Step 2; soft palettes lose the most in the press.
- Tape face-down to the blank, centering the heart artwork on the heart blank carefully - misalignment is glaring on a shaped blank.
- Press with the settings recommended for your material, paper, and inks, with butcher paper.
- Peel hot. The blush tones come out softer than screen - on this preset that reads as romantic rather than washed out, but run a test piece first.
Make It Yours
- The obvious hits: Paris, Venice, New York, Kyoto - but the real hit is the unglamorous hometown where they actually met.
- Two-hearts set: where you met and where you married, identical palette, hung side by side.
- Bolder romance swap: roads
#B0496B, land#FFF6F0- more valentine, less watercolor, and it survives sublimation untouched. - Winter wedding swap: land
#F4F6F8, roads#7A8BA8, water#BCD4E6for a frost-toned anniversary heart. - Add a route layer in deeper rose
#A04E5Etracing the first-date walk - the single most affecting customization this preset has. - Enable the Hanger hole and batch-cut wedding favors from 3 mm ply: the ceremony venue at the heart's center, a date engraved on the back.
- Sublimate onto heart-shaped ceramic ornaments for a first-married-Christmas gift.
- Switch the export shape to circle to de-romanticize the same palette into a soft pastel city print for a nursery.
New free tools, every month.
New laser cutting tools, what's coming next, and features we're building right now. Only MyLaserTools.com news. No spam, ever.
© 2026 MyLaserTools.com. All rights reserved.