Making a green-space city map with the Garden City Map preset
Difficulty: Easy. Time: about 1–2 hours of machine and glue time once exported. Best methods, in order: laser cutting (it's tuned for it), 3D printing, UV print.
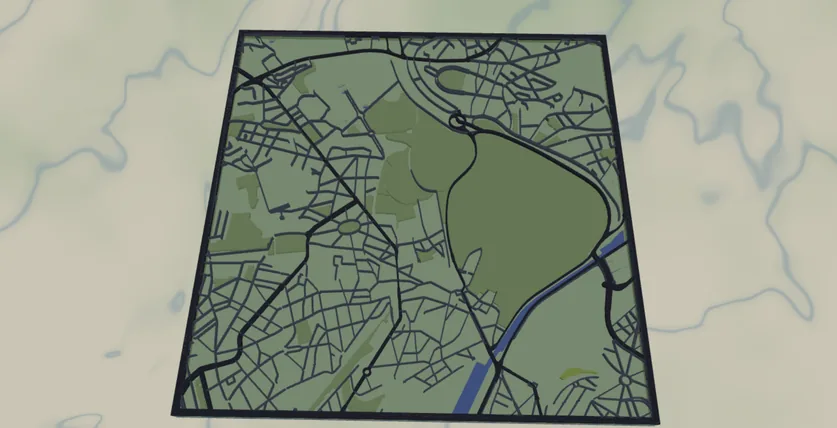
This preset celebrates a city's green spaces instead of its streets. Parks, gardens and allotments are filled in three layered greens, the road grid is laid over them for context, and the water is cut out as holes so a blue backplate shows through. Everything is built from filled shapes, so it cuts and prints cleanly with no fragile spaghetti.
It loads framed on Brussels at zoom ~13, a city ringed by parks and the Sonian Forest. It works best for leafy cities with real green-space coverage: London, Amsterdam, Copenhagen, Vienna, anywhere a botanical garden or big park anchors the view.
What You'll Need
Laser cutting
- 3 mm laser-grade plywood or MDF for the green-space plate and roads (2 sheets) - or green acrylic for the parks layer
- 3 mm acrylic or painted ply in blue for the backplate (
#236cd1), or paint it after cutting - Any diode or CO2 laser that fits your target size (200×200 mm and up works well)
- Wood glue or CA glue, clamps or weights, sandpaper (220 grit)
3D printing
- Any FDM printer; PLA in 2–4 colors (blue, greens, dark gray for roads) or a single color
- Slicer that accepts 3MF (Bambu Studio, PrusaSlicer, OrcaSlicer)
UV print / sublimation
- The exported high-res PNG
- UV flatbed printer or sublimation setup with a hardboard/aluminum blank
Step 1 - Start from the preset
Open the Garden City Map preset. It loads on Brussels at zoom ~13.1 - a whole-city view that catches the big parks plus surrounding neighborhoods. Search your city and pan until the green spaces you care about sit in the frame. Zoom in a notch (13.5–14) for a single park district, out a notch (12–12.5) for the whole metro's green network. If the preview comes back mostly empty, that area just doesn't have much mapped green space - pick a leafier view.
Step 2 - Tune the layers
Three groups, top to bottom:
- Gardens & roads - the main artwork layer, exported as one Solid layer. Three green fills stack here: parks
landusePark(#90be6d), gardenslandcoverGarden(#52b788), and allotmentslandcoverAllotments(#aacc00), with three road classes over them: primaryroadsPrimary(#2d3142, width 4), secondaryroadsSecondary(#2d3142, width 3), and streetsroadsStreet(#4f5d75, width 2). Because it's Solid, on a laser the whole layer fill-engraves - gardens as filled areas and roads as filled ribbons - in one pass. - Water - Solid fill (
#a8d5a2) with invert as holes on. Rivers, canals and lakes are subtracted from the plate so the blue backplate reads through as water. Frame your view so some water actually appears - it's what grounds the design as a city map. - Backplate - solid base plate,
#236cd1blue. Change this to match your acrylic or paint.
Step 3 - Export
- Laser: export the per-layer SVG ZIP - one file per layer. The Gardens & roads layer is Solid, so fill-engrave the whole thing (green areas and road ribbons together) onto the plate rather than cutting the fine streets. Leave water inversion on. Turn on small-polygon cleanup to drop slivers. Add a Hanger hole ring if it's going on a string instead of a wall frame.
- 3D printing: export 3MF for a multicolor stack, or STL for single color.
- UV print: export the high-res PNG (4096 px). Keep Background on so the plate prints as solid color, or turn it off for a transparent-background print on a colored substrate.
Choose Your Build Method
Laser cutting
- Cut the Backplate from your blue material first - it's the registration reference for everything else.
- Cut the Water layer (the green-space plate with water holes) from your park material. This is the visible face, so use a clean sheet.
- Roads ride in the same Solid layer as the gardens, so they fill-engrave as filled ribbons onto the green plate rather than being cut. Trying to cut thin street centerlines just leaves a confetti of fragments; engraving keeps the road grid legible and the plate in one piece. (If you'd rather have crisp single-line scores, set the layer's export type to Score.)
- If you want the three greens as separate materials, cut the parks, gardens and allotments shapes from their own green sheets and inlay them - otherwise the whole green layer is one plate and you paint or stain the zones.
- Glue bottom-up: backplate → green plate (with engraved roads). Thin, even glue; weight it flat for 30 minutes - or skip squeeze-out with 3M tape: 467 or 468 transfer tape for acrylic, 300LSE for harder materials.
- Sand the edges flush, finish with oil or clear spray.
Make It Yours
- Green cities shine here: Amsterdam, Vienna, Singapore, Stockholm - anywhere parks dominate the map.
- Swap the backplate to deep navy
#0E4C66for a moodier water, or warm sand#D9B382for dry-climate cities. - Recolor the three greens into a single tone for a clean monochrome park map, or push the contrast (dark forest parks, bright lime allotments) to separate the green types.
- Turn off
roadsStreetand keep only primary and secondary roads for a calmer, less busy grid. - Add a heart icon from the export modal over a favorite park or community garden - a lovely housewarming gift.
- Use the Hanger hole ring mounting option and cut at ornament size (~90 mm) for a tree decoration.
- Engrave the city name and a coordinates line onto the backplate or a border band before assembly.
New free tools, every month.
New laser cutting tools, what's coming next, and features we're building right now. Only MyLaserTools.com news. No spam, ever.
© 2026 MyLaserTools.com. All rights reserved.