Making a surveyed depth chart with the Crater Lake Surveyed Bathymetry preset
Difficulty: Medium. Time: 2–3 hours including glue-up. Best methods, in order: laser cutting (the classic relief build), then 3D printing. This is a layered relief piece, not a flat print, so it's tuned for stacking material - the depth comes from real survey data, not a modeled guess.
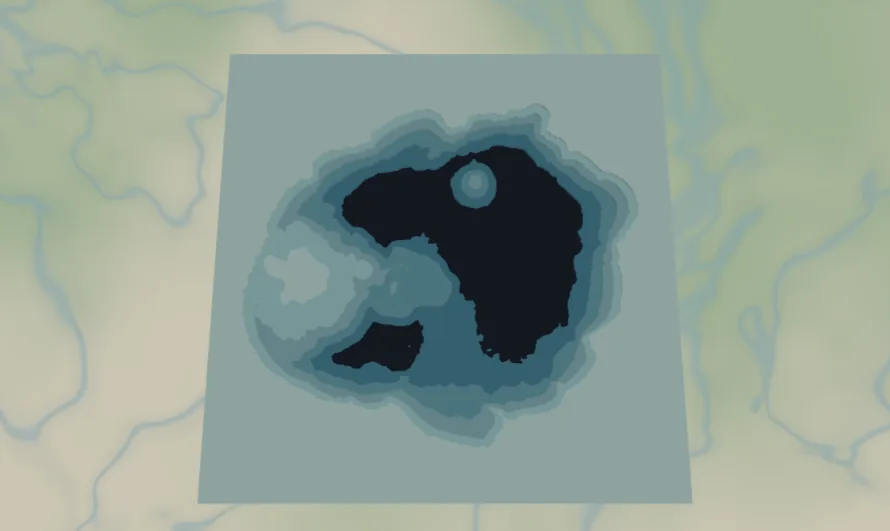
This is the layered bathymetric chart you see in lake houses, but built from real surveyed depths rather than a modeled approximation. A shore plate sits on top, five depth bands step down through a teal ramp, and a deep navy floor marks the bottom. Each band is a plate with the deeper water removed, so the assembled stack reads as a relief of the lake bed.
It loads framed on Crater Lake, Oregon (Crater Lake, United States) at zoom ~11.2 in a square frame with a 10-unit black border. Crater Lake is the showpiece for this preset: a nearly perfect circular caldera that turns the depth bands into clean concentric rings. The same preset works for any lake that has charted survey data behind it.
What You'll Need
Laser cutting
- 7 sheets of 3 mm laser-grade plywood (shore plate + 5 depth bands + backplate) - or 5 shades of blue acrylic for the bands if you want the gradient in material
- 1 backplate sheet, painted or stained dark (
#0E4C66deep navy in the preset) - Laser cutter, glue, weights, masking tape, sandpaper (220 grit)
3D printing
- FDM printer; multicolor (3MF) strongly recommended for the teal depth ramp, or single color + paint
- 3MF-capable slicer (Bambu Studio, PrusaSlicer, OrcaSlicer)
Step 1 - Start from the preset
Open the Crater Lake Surveyed Bathymetry preset. It loads on Crater Lake at zoom ~11.2 in a square frame - the whole caldera fits with a margin of rim around it. Leave it on Crater Lake for the textbook concentric-ring result, or search another lake. The depth here comes from real charted surveys, so the band shapes follow an actual depth contour, not a smooth model. If you switch lakes and the preview shows a flat lake with no rings, that lake isn't in the surveyed set - either pick a well-charted lake or use the Lake Depth Chart preset's Simplified mode instead.
Step 2 - Tune the layers
Three groups, top to bottom:
- Shore plate - the water layer with invert as holes on: a full plate (
#DDF3F1) with the lake cut clean out of it. It's the land around the caldera and the top face of the piece. - Lake depth - bathymetry in advanced mode with invert as holes on, five real surveyed bands. From shallow to deep:
bathymetryBand1(#DDF3F1),bathymetryBand2(#B7E3E4),bathymetryBand3(#8CCFD7),bathymetryBand4(#5DB7CC), down tobathymetryBand5(#2F96B6, deepest). Each band is a plate with the deeper water removed - inverting the water as holes is exactly what makes the lake bed step downward as you stack the plates. Note band 1 shares its color with the shore plate; that's fine for a layered build. - Backplate -
#0E4C66deep navy, the deepest point of the lake (Crater Lake bottoms out near 590 m, the deepest in the United States).
Step 3 - Export
- Laser: per-layer SVG ZIP, water/band inversion left on, small-polygon cleanup on (real depth contours produce slivers along steep caldera walls). The 10-unit border comes through as a square frame. Add a Hanger hole ring if it'll hang from a hook.
- 3D printing: 3MF for the color ramp; STL for single color then paint the basin.
Choose Your Build Method
Laser cutting
- Cut the Backplate from your darkest material - this is the deepest water.
- Cut the five Lake depth plates, deepest (band 5) to shallowest (band 1). On Crater Lake these come off as near-perfect nested rings; pencil the band number on each back, they stack tightly and are easy to mix up.
- Cut the Shore plate last - it's the visible face, so use your cleanest sheet.
- Dry-fit bottom-up: backplate → band 5 → 4 → 3 → 2 → 1 → shore plate. Check the nesting against the on-screen chart.
- Glue bottom-up, weight it flat, then sand the outer square edges flush in one pass so the stack looks like a solid relief block. If you cut the bands from acrylic, 3M tape 467 or 468 bonds them cleanly; 300LSE suits harder materials.
- Finish with matte clear; if you cut everything from one wood, stain or paint the band edges through the teal ramp before assembly so the depths read.
Make It Yours
- Crater Lake is the showpiece (those concentric rings!), but any surveyed lake works: Tahoe, Superior bays, Loch Ness, Lake Baikal.
- Swap the teal ramp for navy-to-ice:
#0B2E4F,#15507E,#2E78A6,#6FA8C9,#B8D8E8for a deeper, moodier chart. - Stain the shore plate walnut and leave the bands natural for the classic lake-house look.
- Engrave the lake name, max depth, and surface elevation on the shore plate or border before assembly.
- Add a heart icon over a favorite cove, dock, or the Wizard Island spot on Crater Lake.
- Ornament version: switch
exportShapeto circle at ~100 mm and add a Hanger hole ring. - Pour clear epoxy over the assembled basin for a glassy, bar-top finish that makes the depth bands pop.
New free tools, every month.
New laser cutting tools, what's coming next, and features we're building right now. Only MyLaserTools.com news. No spam, ever.
© 2026 MyLaserTools.com. All rights reserved.