Making one-piece script signs with the Connected Text Generator
Difficulty: easy. Time: 10 to 20 minutes of design, plus machine time. Best methods, in order: laser cutting, 3D printing, vinyl cutting.
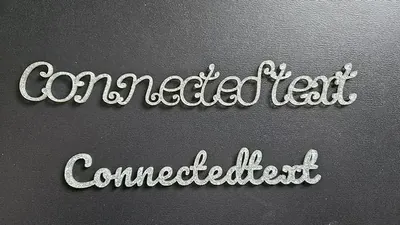
Script fonts look beautiful on screen but fall apart on the laser bed: dot the i, cross the t, and you have five loose pieces where you wanted one name. This tool solves that by physically overlapping and unioning the glyphs into a single connected path. Type a word, pick a script font, and the preview shows exactly the one-piece shape your machine will cut.
It is the workhorse behind name signs, cake topper words, wedding decor, and personalized gifts. The same path exports as an SVG for laser or vinyl cutting, or as an STL/3MF for printing the word as a standalone 3D object.
What You'll Need
- Laser cutting: laser cutter, 3 mm laser-grade plywood or acrylic in your accent color
- 3D printing: any FDM printer, one spool of filament; a second color if you want a backed sign
- Vinyl cutting: Cricut or similar cutter, adhesive or heat-transfer vinyl, weeding tools, transfer tape
Step 1 - Type your word and pick a font
Open the tool and enter your word in Your Text. Choose a script font from the Font selector; heavily connected cursive faces need the least help, while airier scripts rely more on the spacing controls. Toggle Vertical Text if you want the word to read top to bottom, which makes great door-side decor.
Step 2 - Tune the connections
- Letter Spacing pulls glyphs together until every letter overlaps its neighbour. Watch the preview: gaps mean loose pieces.
- Word Spacing controls the bridge between words in multi-word phrases.
- Thickness expands the whole path outward. Thin script strokes snap easily in 3 mm wood, so add a little thickness for anything under about 150 mm wide.
- Connect Dots ties the dots of i and j into the body so they do not fall out as separate pieces.
- Score Letter Edges adds the original letter outlines as a score layer, so the cut piece still shows where each letter begins and ends.
- Text Width with the Units selector sets the real-world size of the finished piece.
Step 3 - Export
Download an SVG for laser or vinyl cutting, or an STL or 3MF at your chosen extrusion depth for 3D printing. The export is one merged shape, so there is nothing to weld or group in your machine software.
Step 4 - Make a whole batch at once
Producing the same design for a list of words or names? Use the Single / Batch toggle above the text field. Switch to Batch, then type one entry per line or upload a .txt file. The preview tiles every design so you can check the whole set before exporting, and a single download gives you all of them: the SVG arrives as one sheet with every word laid out for efficient cutting, and STL/3MF downloads bundle one model per word in a zip. Saving and sharing are paused while you are in Batch mode.
Choose Your Build Method
Cutting the word
- Import the SVG into your laser software and scale-check the width against your material.
- If you enabled Score Letter Edges, assign the score layer a low-power line setting and the outline a cut setting.
- Cut from 3 mm plywood or acrylic. Mask wood faces to avoid smoke staining on the fine strokes.
- Peel the masking carefully along the stroke direction; thin script tails tear before they lift if you rush across them.
- Glue to a backer or add a hanging hole in your laser software for a standalone name sign.
Make It Yours
- Cut a name in acrylic and stand it in a slotted wood base for a wedding head-table sign.
- Use Vertical Text for a stacked family name beside the front door.
- Drill or design a small hole in the lead-in stroke and hang the word from ribbon as an ornament.
- Punch a hole in the first letter and add a snap clip to wear a name as a bag charm.
- Score Letter Edges plus a light engrave gives a premium two-tone look on walnut plywood.
- Print the word at 2 mm and glue it onto a painted MDF plaque for fast craft-fair stock.
- Chain several words with Word Spacing into a short phrase like "hello there" for tiered-tray decor.
- Cut the same word at three sizes for a graduated gallery-wall set.
New free tools, every month.
New laser cutting tools, what's coming next, and features we're building right now. Only MyLaserTools.com news. No spam, ever.
© 2026 MyLaserTools.com. All rights reserved.