
Mapping every café in your neighbourhood with the Coffee Crawl Map preset
Difficulty: Easy. Time: under an hour of design time, then your printer's run. Best method: full-colour / UV print (it's a warm-toned print design). A laser version works as a single monochrome engraved tile.
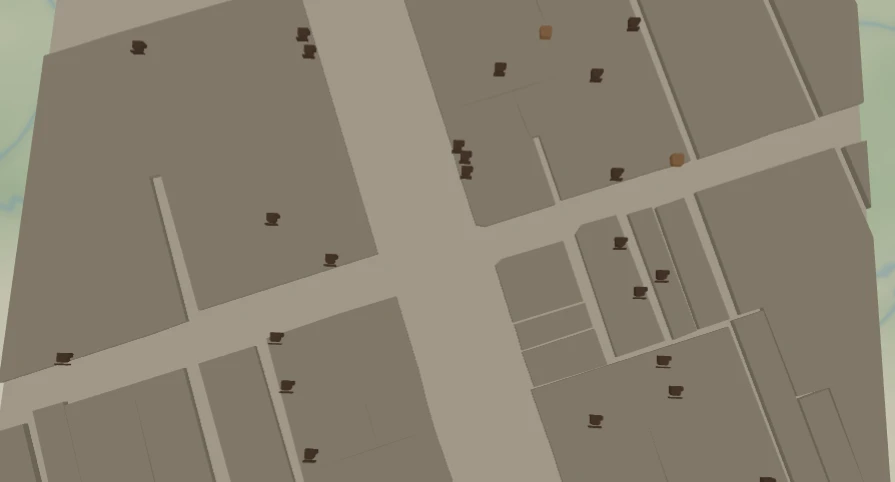
This is a print-first preset built around one delicious idea: a map of your neighbourhood with every coffee shop on it. The Coffee Crawl Map centres on Melbourne at close zoom over a warm cream street grid, then drops a Points of Interest layer on top - a little espresso-brown coffee cup for every café and a caramel loaf for every bakery, each pinned at its real location straight from OpenStreetMap.
The square frame keeps a whole coffee district in view at once, so you can trace a Saturday-morning crawl from cup to cup. It's made for the coffee lover in your life - the barista, the flat-white devotee, the person who has a favourite roaster. Recolour the cups to a roaster's brand, add the city name and a "Coffee Crawl" title, and it becomes a personal keepsake of a neighbourhood you love.
What You'll Need
UV print / sublimation
- The exported high-res PNG (4096 px)
- UV flatbed printer, or a sublimation setup with a coated blank (wood, hardboard, aluminium)
- Light or cream blanks let the warm map tones and coloured markers stay true
Poster / paper print
- The exported high-res PNG sent to a photo lab or printed on matte or textured art paper
- A frame; a warm wood or cream frame suits the cosy café palette
Laser (optional, single tile)
- A light wood or coated tile that engraves with contrast
- Any diode or CO2 laser
- Note: the café and bakery colours won't survive a laser - use it for a monochrome engraved version
Step 1 - Start from the preset
Open the Coffee Crawl Map preset. It opens on Melbourne, Australia at zoom 14.6 in a square (1:1) frame, with a warm cream street grid and a scatter of little coffee-cup and loaf markers - one for every café and bakery in the area. Pan so your favourite coffee district sits in the middle of the frame.
Keep the zoom around 14 to 15. The markers come from OpenStreetMap points that only load at close zoom (they fetch from zoom-14 tiles), so if you zoom way out the cups and loaves disappear. Staying in the 14 to 15 range keeps the whole neighbourhood of cafés in frame while every marker stays visible.
Step 2 - Tune the layers
The preset has two layer groups. The first, "City base", is the warm cream OSM map underneath - every feature is Solid fill or line, so the palette is your only dial:
- Land background - Solid fill, warm cream
#F5EDE0. The cosy base tone that makes the whole map feel like a café interior. - Water - Solid fill, muted stone
#CBB79A. Any nearby river or bay reads as a soft, warm accent rather than a cold blue. - Parks - Solid fill, oat green
#E4D8BE. Green space kept gentle so it never competes with the markers. - Buildings - Solid fill, pale sand
#EBE0CD. The blocks of the district, a shade off the background so the streets stay legible. - Primary roads - Solid line, tan
#D8C6A6(width 2.6). The main avenues through the neighbourhood. - Secondary roads - Solid line, light tan
#DECDAF(width 1.8). The connecting streets. - Streets - Solid line, cream
#E6D9C1(width 1.1). The fine local mesh that ties the cafés together.
The whole base is deliberately low-contrast and warm so the coloured markers sit on top of it like sprinkles. If you want the cups to pop harder, nudge the land background a touch lighter and leave the roads soft.
The second group, "Coffee spots", is the star: a Points of Interest (POI) layer in Symbol mode. Click it to open its settings, where you can shape exactly what gets marked and how:
- Categories - this preset shows two: Cafés and Bakeries. Add more (restaurants, bars, ice cream and others) to fold them into the same map, or drop one to keep it purely about coffee.
- Symbol per category - cafés use the coffee-cup symbol in espresso brown
#6F4E37; bakeries use the bread/loaf symbol in caramel#C6893F. Each category picks its own symbol and colour, so the map reads at a glance. - Symbol size - one slider scales all the markers together. Bump it up for a bold, playful look or down when a dense district would otherwise crowd.
- Marker style - a toggle between Symbol only (always draws the icon at each point, which is what this preset uses) and Building highlight (fills the café's building footprint when we can find one, and falls back to a dot when we can't). Symbol only keeps the map clean and even; building highlight is worth trying if you want the actual shops shaded in.
- Clustering - an option that collapses dense knots of markers into a single ball with a count. This preset leaves it off so you see every individual cup, but for a packed downtown it stops the icons piling on top of each other.
Step 3 - Export
- UV / sublimation: export the high-res PNG (4096 px). Keep the Background toggle on so the cream base prints as a solid warm field, or turn it off for a transparent background to let a natural wood blank show through behind the markers.
- Poster: same high-res PNG, sized to your paper. The square 1:1 frame suits a 12x12 or 20x20 print.
- Laser (optional): export the per-layer SVG ZIP, ignore the colours, and engrave the street grid and marker symbols as a single tonal pass.
Choose Your Build Method
UV print / sublimation
- Export the high-res PNG. Leave the Background on for a clean cream field that shows off the coloured markers, or turn it off and print onto a natural wood blank so the grain warms the map even further.
- For sublimation, mirror the image and press onto a wood, hardboard, or aluminium blank per its spec. Light or cream blanks keep the espresso and caramel tones true.
- On a UV flatbed, print straight onto wood, acrylic, or hardboard. A white underbase keeps the marker colours opaque on darker stock.
- A satin finish suits the cosy café palette; gloss makes the cup and loaf colours read brightest.
Poster / paper print
- Send the high-res PNG to a photo lab or print on matte or textured art paper for a framed neighbourhood keepsake.
- Frame in a warm wood or cream frame to complete the café look.
- The 1:1 square crop is set for you - keep it square, or re-export after switching the aspect ratio for a portrait format with room for the city name and a "Coffee Crawl" title below.
Make It Yours
- Centre it on your own home town or the coffee district you know best - your morning-walk neighbourhood, a holiday town, or the street where you had your first flat white.
- Add restaurants or bars as extra categories in the POI layer, each with its own symbol and colour, to turn a coffee crawl into a full food-and-drink map.
- Recolour the cups to a favourite roaster's brand colour so the map doubles as a nod to the shop that fuels you.
- Add the city name and a "Coffee Crawl" title under the map in a friendly typeface for a poster-ready finish.
- Print small as a set of coasters - one neighbourhood per coaster - for a coffee lover's gift.
- Turn on Clustering for a dense downtown so packed knots of cafés collapse into a single counted ball instead of overlapping icons.
- Try the Building highlight marker style to shade in the actual café buildings instead of dropping symbols, for a more architectural take on the same idea.
New free tools, every month.
New laser cutting tools, what's coming next, and features we're building right now. Only MyLaserTools.com news. No spam, ever.
© 2026 MyLaserTools.com. All rights reserved.