3D printing a parks-and-streets map with the Stacked Parks and Streets preset
Difficulty: Easy–Medium. Time: 2–4 hours of print time once exported. Intended for 3D printing - export a multicolor 3MF for the full green/black/blue stack, or a single-color STL.
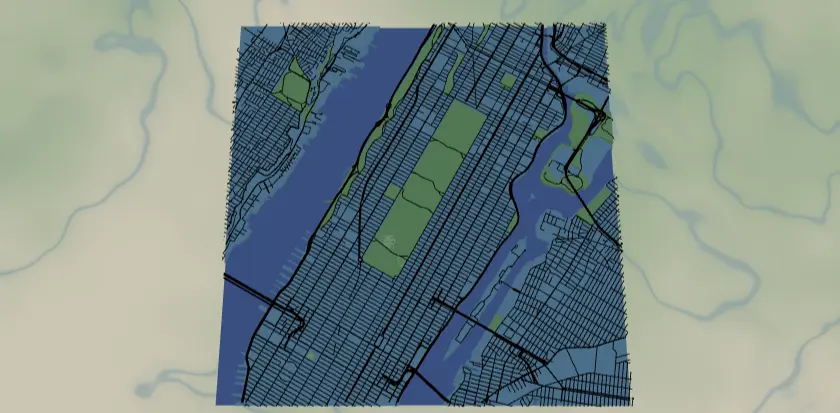
This preset is the 3D-print variant of the City Parks map: instead of cut-and-glued sheets, the design becomes one stacked solid you print flat on the bed. A solid backplate forms the base, the land sits above it, parks rise as raised green slabs, roads stand proud as bold ridges, and water is recessed into the surface so it reads as the low ground. It loads on Central Park at zoom 12.8 - most of Manhattan with the park as a bold green block.
Because layers stack into physical relief, this build relies on Solid bodies and Cut outlines, not Score lines. A Score (line-mode) layer is a single centerline with no width, so it has nothing to extrude - everything you want to see in the print needs to be a Solid fill or part of the Cut outline. Export a 3MF to get every layer pre-stacked in its own color, or an STL for a single-filament print you can swap colors on mid-job.
What You'll Need
3D printing (recommended)
- Any FDM printer; PLA or PETG in up to 5 colors - two-to-three greens, black for roads, blue for water/backplate, plus a land color
- Slicer that accepts 3MF (Bambu Studio, PrusaSlicer, OrcaSlicer); an AMS/MMU or manual filament swaps for multicolor
- Optional: a multicolor system makes the green park tiers shine, but a single color reads fine as pure relief
Laser cutting (alternative)
- 3 mm laser-grade plywood for the land plate; green ply/acrylic for parks; blue acrylic for the backplate
- Laser cutter, glue or 3M tape, weights, masking tape
Step 1 - Start from the preset
Open the Stacked Parks and Streets preset. It loads on Central Park at zoom 12.8 - most of Manhattan with the park as a bold green block. Search your city and aim the frame so at least one large park dominates; zoom 12.5–13.5 works for big urban parks, tighter (14) for a single neighborhood park. The contrast between grid and green is the design - pick a spot where both are strong, and where some water appears so the recessed channel has something to do.
Step 2 - Tune the layers
Four layer groups, top to bottom, all Solid bodies that stack into relief:
- Roads - Solid mode, black (
#000000): motorway (width 6), motorway links and primary (5). These are the tallest, boldest ridges - widths 5–6 keep them thick enough to print cleanly as raised lines. - Parks - Solid mode, three greens:
landusePark#6FBF73,landuseRecreation#8FCF8F,landcoverGrassland#A8D8A8. Raised green slabs above the land. Three close greens give subtle variety in a multicolor print; unify them to one green if you're printing single-color or want a bolder block. - Water - Solid mode, blue (
#4EA8DE). In this 3D build the water sits as the recessed low ground - the river and reservoirs read as the channel carved below the raised land and parks. - Backplate - solid base body,
#236cd1blue. This is the floor everything stacks on; it sets the print's overall thickness.
Step 3 - Export
- 3D printing: export the 3MF for the full multicolor stack - backplate, land, green park tiers, black roads, recessed water all arrive pre-stacked and colored. Export an STL for a single-color print you'll color with filament swaps.
- Small-polygon cleanup on - grassland produces confetti, and tiny slivers print poorly or not at all.
- Laser (alternative): per-layer SVG ZIP, water inversion on for the cut build.
Choose Your Build Method
3D printing
- Export the 3MF and open it in your slicer - the backplate, land, green parks, black roads, and recessed water arrive pre-stacked with their colors assigned. With an STL you'll print one color; plan filament swaps at the layer heights where parks and roads begin for a multi-tone look without an AMS.
- Print flat on the bed, no supports - every feature rises from the backplate, so the print is fully self-supporting.
- Layer height: 0.2 mm is the sweet spot. The raised road ridges and park slabs only need a few layers of height (0.6–1.0 mm) to read clearly against the land.
- Scale / minimum size: keep it 150–180 mm+ wide so the width-5 road ridges and the smaller grassland patches hold. Below ~120 mm the thinnest features merge or drop out.
- Filament swaps (single-color STL): swap to green where the park layer starts, to black where roads start. Most slicers let you insert a color-change at a specific layer height - match it to the relief heights you set.
- Pop it off the bed - no glue, no clamps. The whole map is one solid piece.
Make It Yours
- Park-proud cities print best: NYC (Central/Prospect), London's royal parks, Vancouver's Stanley Park, Chicago's lakefront.
- Unify the three greens to
#2E7D43for a bold single-green statement, or print all three for a tiered patchwork relief. - Single-color print? Drop everything to one filament and let the stacked heights alone tell the parks/roads/water story.
- Raise the road relief taller for a chunkier, more tactile grid; lower it for a subtler texture.
- Print the backplate in a contrasting color so it frames the map as a built-in border.
- Add
landcoverForestto the Parks group for cities ringed by woodland - more raised green to play with. - Add a hanger hole at export and print at ornament scale (~90 mm) for a desk or tree piece.
New free tools, every month.
New laser cutting tools, what's coming next, and features we're building right now. Only MyLaserTools.com news. No spam, ever.
© 2026 MyLaserTools.com. All rights reserved.