Making a parks-and-streets map with the City Parks preset
Difficulty: Easy–Medium. Time: 1–2 hours. Best methods, in order: laser cutting, UV print, 3D printing.
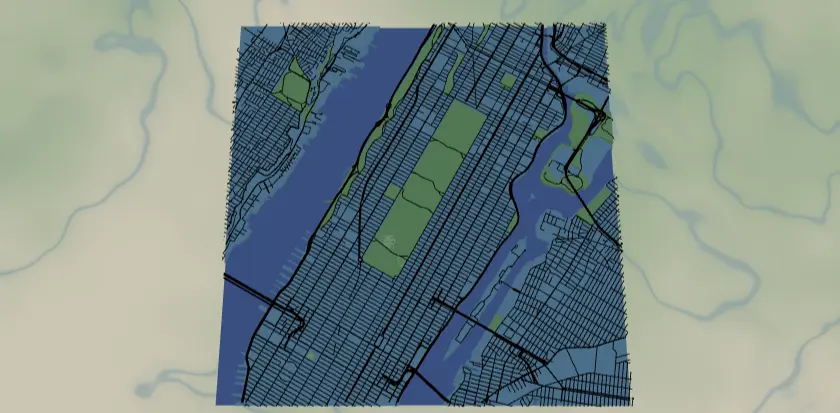
This preset celebrates a city's green space: the street grid in black, parks and recreation areas in three shades of green, and water cut out as holes over a blue backplate. It loads on Central Park, where the rectangle of green against the Manhattan grid does all the talking.
What You'll Need
Laser cutting
- 3 mm laser-grade plywood for the land plate; green ply/acrylic for parks; blue acrylic or paint for the backplate (
#236cd1) - Laser cutter, glue, weights, masking tape
UV print / sublimation
- High-res PNG, flat blank
3D printing
- FDM printer; multicolor (3MF) recommended - green(s), black, blue, plus a land color
Step 1 - Start from the preset
Open the City Parks preset. It loads on Central Park at zoom 12.8 - most of Manhattan with the park as a bold green block. Search your city and aim the frame so at least one large park dominates; zoom 12.5–13.5 works for big urban parks, tighter (14) for a single neighborhood park. The contrast between grid and green is the design - pick a spot where both are strong.
Step 2 - Tune the layers
Five layers, top to bottom:
- Major roads - Solid mode: motorways (width 4), motorway links and primary (3), black. The structural lines, exported as solid fills (fill-engrave them on a laser).
- Streets - Score mode: secondary, tertiary, and streets, all width 2, black. On a laser these score as single-pass centerlines (line mode), not filled ribbons - the fine grid texture. The first thing to thin out if it's too busy.
- Parks - Solid mode, three fills:
landusePark#6FBF73,landuseRecreation#8FCF8F,landcoverGrassland#A8D8A8. Three close greens give the green space subtle variety; unify them to one green if you're cutting parks from a single sheet. - Water - Solid with invert as holes: a land plate with rivers/reservoirs subtracted, blue backplate showing through.
- Backplate -
#236cd1blue.
Step 3 - Export
- Laser: per-layer SVG ZIP, water inversion on, small-polygon cleanup on (grassland produces confetti). Streets score as single-pass centerlines; parks and the land plate are the cut layers. Major roads come through as solid fills, so fill-engrave those or score their centerlines to taste.
- UV print: high-res PNG; Background off for transparent printing onto colored substrate.
- 3D printing: 3MF for colors, STL for single color.
Choose Your Build Method
Laser cutting
- Cut the Backplate from blue material.
- Cut the Water layer - the land plate with water holes - from your land-colored sheet. Tape first; islands (hello, Manhattan neighbors) come loose.
- Cut the Parks layer from green stock. These are chunky shapes and cut cleanly; small grassland patches that survived cleanup can be skipped at assembly if too fiddly.
- Glue parks onto the land plate, land plate onto the backplate - or use 3M tape for a no-mess bond: 467 or 468 for acrylic, 300LSE for harder materials.
- Score Streets as single-pass lines, then fill-engrave Major roads, onto the assembled face (or onto the land plate before gluing parks - but the parks sit on top of the grid visually, so doing this after assembly matches the design). Test power on scrap.
- Sand, finish, frame.
Make It Yours
- Park-proud cities work best: NYC (Central/Prospect), London's royal parks, Vancouver's Stanley Park, Chicago's lakefront.
- Unify the three greens to
#2E7D43for a bolder single-green statement, or push them apart for a patchwork effect. - Autumn edition:
#D98E32,#C96F2E,#E3B448for the three park features. - Drop the Streets layer entirely for a minimal "parks and arteries" poster.
- Mark a park bench, playground, or wedding spot with a heart icon at export.
- Corner holes mounting option + anodized standoff spacers = floating acrylic wall mount.
- Add
landcoverForestto the Parks group for cities where woodland rings the center.
New free tools, every month.
New laser cutting tools, what's coming next, and features we're building right now. Only MyLaserTools.com news. No spam, ever.
© 2026 MyLaserTools.com. All rights reserved.