Making a tree-shaped festive map with the Christmas Tree Map preset
Difficulty: Easy. Time: 20–40 minutes per piece. Best method: laser cutting and engraving - the export is a tree-shaped cutout, so the cut line is the whole charm. Pairs beautifully with two-colour acrylic or painted stock.
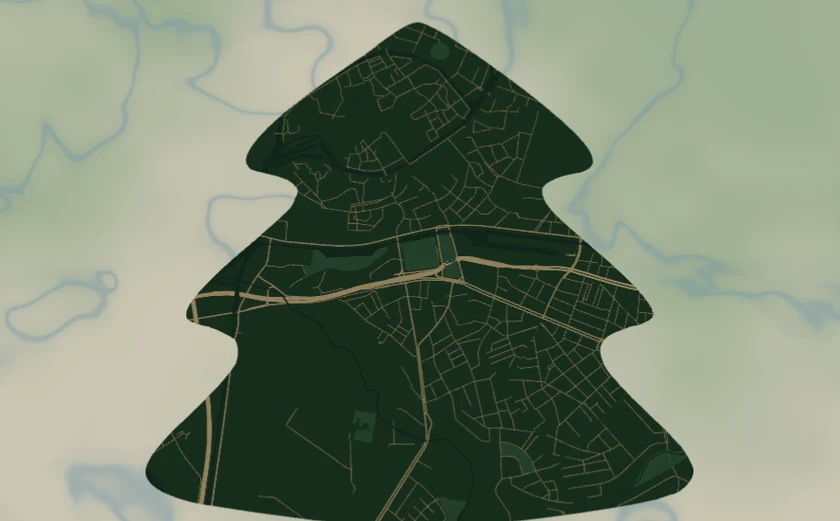
A city map cut into the silhouette of a Christmas tree: deep forest-green land (#1F4D2E) threaded with warm gold streets (#E8C879), framed by the christmas-tree export shape so the whole map comes off the laser as a tree-shaped ornament or card. It loads on Strasbourg at zoom 13.4 - the dense old-town grid of one of Europe's great Christmas-market cities reads gorgeously as gold tracery inside the tree.
A note on the colours up front: the green land and gold roads are a design target, not something a bare laser produces. An engrave is monochrome - it burns whatever the material colour is. To get the green-and-gold look you need one of: green-painted/stained stock where the engrave reveals natural wood, gold-on-green two-colour acrylic, or full-colour UV print. On plain plywood it becomes a handsome burnt-brown-on-tan tree instead - which is still lovely on the mantel.
What You'll Need
Laser (recommended)
- Tree-stock, ~80–120 mm tall: 3 mm Baltic birch, green-painted/stained MDF, or green-surface two-colour acrylic (green cap / gold or natural core is the cheat code here)
- Laser cutter/engraver (diode or CO2)
- Ribbon, twine, or snap clips for hanging; optional gold paint pen to hand-fill the engraved roads
- 3M tape if you back the tree onto a card or a second layer
Step 1 - Start from the preset
Open the Christmas Tree Map preset. It loads Strasbourg at zoom 13.4 inside the tree silhouette. Search for your recipient's city. Framing tips for a shaped cutout:
- The tree is narrow at the top, wide at the base, so the most recognizable part of the map should sit in the lower-middle third where the silhouette is widest - that's where streets stay legible.
- Zoom 13–14 is the ornament sweet spot: at 90–120 mm you want a neighbourhood-scale map where individual roads survive the cut. Whole-city zooms turn to mush inside the narrow tip.
- Centre on the landmark, not the geometric city centre - the square where the Christmas market runs, the street they grew up on.
Step 2 - Tune the layers
One layer group, Tree map - every feature is a filled colour field (Solid mode), painting the inside of the tree silhouette:
land- forest green#1F4D2E, the base that fills the tree.water- darker green#15402A, andlandusePark- brighter green#2C6B3F. Heads-up: these three greens are close in tone, so on a monochrome engrave they barely separate. If you're engraving on a single material, push water much darker / parks lighter to map to distinct grayscale levels, or leave them as subtle texture and let the gold roads carry the design.roadsMotorway- gold#E8C879, width 4;roadsPrimary- gold#E8C879, width 3;roadsSecondary-#D8B968, width 2;roadsStreet-#C9AB5C, width 1. On two-colour acrylic these are your 'engrave through to the core' lines; the 4/3/2/1 widths give a lovely hierarchy that reads like gold tinsel.
For engraving on plain wood, an easy win: invert the logic - set land to no-engrave and roads to a deep burn, so the laser only scorches the streets and the job runs in minutes instead of rastering the whole green tree. The bare wood becomes the tree body, the burnt roads the decoration.
Step 3 - Export
- Keep the christmas-tree export shape - that tree outline is your laser cut line, and the features engrave inside it.
- Laser: download the combined SVG (or per-layer SVG). Assign the tree outline to cut and the map features to engrave.
- Enable the Hanger hole in the Mounting holes panel and place it at the top of the tree (the tip) so it hangs straight as an ornament - ~3–4 mm for ribbon, smaller for a wire hook.
- Turn on small-polygon cleanup so stray street fragments don't pepper the engrave.
- For a full-colour festive card instead, export the high-res PNG with Background on - this is the only way to print the green-and-gold literally.
Choose Your Build Method
Laser engrave + cut
- Load the SVG in your laser software at final size (90–120 mm tall is classic tree-ornament scale).
- Assign operations: map features = engrave, tree outline + hanger hole = cut, cut last so the piece stays anchored while it engraves.
- On green two-colour acrylic: raster the roads through the green cap to expose the gold/natural core - instant green-and-gold without paint.
- On wood: stain or spray the blank green first, then engrave so the burn reveals lighter wood; or engrave bare and trace the major roads with a gold paint pen afterwards.
- Cut the tree perimeter and hanger hole, then clean up - de-mask acrylic, or light-sand and wipe smoke residue off wood.
- Thread ribbon through the hole at the tip and tie a hanging loop.
Make It Yours
- Make it the city where someone spends Christmas - hometown, grandma's village, the city you got engaged in - and engrave the year along the base of the tree.
- Stand it up: cut a small slotted base or back the tree onto a second flat layer with 3M tape so it stands on a shelf instead of hanging.
- Layer it: cut the green tree from acrylic and a gold backing tree slightly larger, glue offset so a gold rim glows behind the roads.
- Garland of cities: cut five small trees of five meaningful towns and string them on one ribbon across a mantel.
- Cut from clear or glitter acrylic and engrave only the roads - hung in front of tree lights, the streets sparkle.
- Add a snap clip instead of ribbon and it becomes a festive map keychain or zipper charm.
- Batch mode for holiday markets: keep the tree layout and swap only the searched city - one engrave file per town in your region.
New free tools, every month.
New laser cutting tools, what's coming next, and features we're building right now. Only MyLaserTools.com news. No spam, ever.
© 2026 MyLaserTools.com. All rights reserved.