

Making a city map Christmas ornament with the Christmas Ornament Map preset
Difficulty: Beginner · Time: 20–40 minutes per ornament · Methods, ranked: 1) Laser engrave + cut (wood, two-color acrylic, or painted stock), 2) full-color UV print on ornament blanks - the only method that reproduces the red-and-gold palette literally, 3) sublimation on coated MDF ornament blanks.
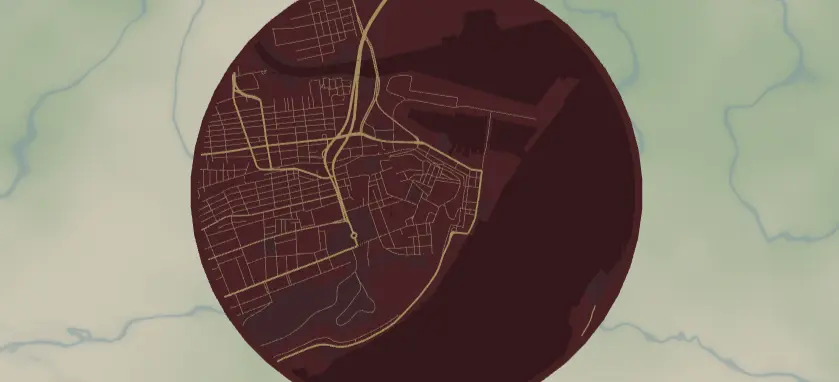
A round map of a meaningful place - the city where you got engaged, grandma's hometown, baby's first Christmas address - styled in deep festive red with gold streets, ready to hang on the tree. The preset frames the city in a circle with a built-in border ring, and the export modal adds the hanger hole. These sell brilliantly at holiday markets and personalize in about two minutes per city.
A note on the colors up front: the deep red land (#7A1F2B) and gold roads (#F4D58D) are a design target, not something a laser produces by itself. An engrave is monochrome - burn on whatever the material color is. To get the red-and-gold look you need one of: gold-on-red two-color acrylic, red-painted/stained stock where the engrave reveals gold or natural wood, gold acrylic with red paint fill, or UV/sublimation printing. Plain wood works too - it just becomes burnt-brown-on-tan instead of festive red.
What You'll Need
Laser (recommended)
- Ornament stock, ~75–90 mm: 3 mm Baltic birch, red-core two-color acrylic (red surface / gold or white core is the cheat code here), or pre-painted MDF rounds
- Laser cutter/engraver (diode or CO2)
- Ribbon, twine, ornament hooks, or snap clips in a colour to match; optional gold paint pen for hand-filling engraved roads
UV print
- White or clear acrylic ornament blanks with pre-drilled holes, flatbed UV printer or print service
Sublimation
- White coated MDF/aluminum ornament blanks, sublimation printer, heat press
Step 1 - Start from the preset
Open the Christmas Ornament Map preset. It loads on Quebec City at zoom 13.4 - Old Quebec inside a circle frame with a red border ring. Search for your recipient's city.
Framing tips:
- Zoom 13–14 is the ornament sweet spot: at 80 mm diameter you want a neighborhood-scale map where individual streets stay legible after engraving. Whole-city zooms turn to mush at this size.
- Center on the landmark, not the geometric city center - the church where they married, their actual street.
- The circle crops aggressively; drag until the most recognizable shape (riverfront, old-town grid) sits in the middle two-thirds.
Step 2 - Tune the layers
One layer group, Engraving (Solid mode), painting the whole disc:
- Land - deep red background (
#7A1F2B) - Water - darker red (
#5A1620) and parks - muted red (#69323B). Heads-up: these three reds are close in tone, so on a monochrome engrave water and parks barely separate from land. If you're engraving (not printing), either push water much darker / parks lighter so they map to distinct grayscale levels, or simply leave them as subtle texture and let the roads carry the design. - Roads - motorway (gold
#F4D58D, width 4), primary (gold, 3), secondary (#EFC97E, 2), neighborhood streets (#E5BC6F, 1). On two-color acrylic these are your "engrave through to the core" lines; widths 4/3/2/1 give a lovely hierarchy at 80 mm.
The global border (red, padding 12) gives the ornament a solid rim - keep it, it's what the hanger hole anchors into and it protects the streets from the edge of the cut.
For engraving on plain wood, an easy improvement: set land to white (no engrave), roads to black (engrave) - the inverse of the preset - so the laser only burns the streets and the job runs in minutes instead of rastering the whole red disc.
Step 3 - Export
In the export modal:
- Enable the Hanger hole in the Mounting holes panel - this is the make-or-break option. It adds a ring with a real hole; position it at the top center and size the hole ~3–4 mm for ribbon, smaller for wire hooks. The ring merges with the border so it cuts as part of the ornament.
- Laser: download the per-layer SVG (or combined SVG). The circle boundary is your cut line; the features engrave.
- UV print / sublimation: download the high-res PNG (4096 px) with the Background toggle on - this is where the red and gold actually print.
- Small-polygon cleanup on, so stray street fragments don't pepper the engrave.
Choose Your Build Method
Laser engrave + cut
- Load the SVG in your laser software at final size (75–90 mm diameter is classic tree scale).
- Assign operations: features = engrave, outer circle + hanger hole = cut, cut last.
- On two-color acrylic: raster the roads (and optionally water) through the red cap layer to expose the gold core - instant red-and-gold without paint.
- On wood: engrave, then cut; optionally trace the major roads with a gold paint pen, or spray the blank red first and let the engrave burn through to bare wood.
- Cut the perimeter and hanger hole, clean smoke residue (de-mask acrylic, light sand or hand wipe on wood).
- Thread ribbon through the hanger hole and tie a loop.
Make It Yours
- Engrave the year and city name in the border ring - the padding-12 rim has just enough room for small text.
- "First Christmas in our new home" series: same city, new house centered, new year, every year.
- Swap the palette: forest green land + warm white roads, or navy + silver for Hanukkah-friendly decor.
- Cut from clear or glitter acrylic and engrave only the roads - hung in front of tree lights, the streets glow.
- Make a garland: five small ornaments of the five cities someone has lived in, strung on one ribbon.
- Use the heart export shape instead of the circle for an anniversary ornament.
- Batch mode for markets: keep the layout, swap only the searched city - one engrave file per town in your region.
New free tools, every month.
New laser cutting tools, what's coming next, and features we're building right now. Only MyLaserTools.com news. No spam, ever.
© 2026 MyLaserTools.com. All rights reserved.