Making custom cake toppers with the Cake Topper Generator
Difficulty: easy. Time: 10 to 20 minutes of design, plus machine time. Best methods, in order: laser cutting, 3D printing. Covers the Name, Multi-Line, and Two Stakes modes.
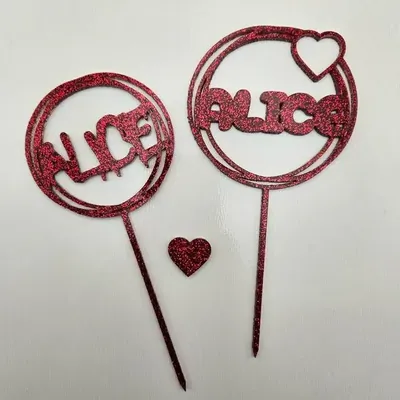
A cake topper is connected text with a job: it has to read beautifully from across the room and survive being stabbed into buttercream. This tool handles both halves, fusing your words into one piece and growing food-pick stakes straight out of the design, so nothing is glued and nothing falls in the cake.
Three modes share the same generator, switchable from the tabs at the top of the page. Name is a single word or name with optional pictogram symbols, riding on one stake. Multi-Line stacks phrases like "happy birthday" over a name. Two Stakes spans wider designs across two supports for big statement toppers. (Two more tabs link out to the separate Layered Cake Topper tools, which have their own guides.)
What You'll Need
- Laser cutting: laser cutter, 3 mm acrylic (glitter and mirror acrylic are topper royalty) or laser-grade plywood
- 3D printing: any FDM printer; PLA in gold, silk, or party colors
Step 1 - Pick a mode and type your text
Open the tool and pick Name, Multi-Line, or Two Stakes from the tabs. Type your text and choose a script font; in Name mode you can also add pictogram symbols (hearts, stars, and friends) with the Symbol size control. Keep phrases short; toppers are read at a glance from party distance.
Step 2 - Size the topper and stakes
- Text Width sets the finished width; 120 to 160 mm suits a standard 8 inch cake.
- Text Offset X/Y fine-tunes where the words sit relative to the stakes.
- Stake Width and Stake Height size the picks; 80 to 100 mm tall stakes anchor firmly through frosting into the cake.
- In single-stake modes, Stake Horizontal/Vertical Offset positions the stake under the design's balance point so it does not lean.
- In Two Stakes mode, Left Stake Offset and Right Stake Offset place each stake under solid parts of the text, with Stakes Vertical Offset to set their height together.
Step 3 - Export
Download the SVG for laser cutting or an STL/3MF at your chosen depth for 3D printing. Text and stakes export as one merged piece.
Choose Your Build Method
Cutting the topper
- Import the SVG and check the width against your cake size.
- Cut from 3 mm cast acrylic; glitter, mirror gold, and frosted finishes are the classic topper looks. Plywood gives a rustic alternative.
- Leave the protective film on acrylic during cutting and peel after.
- Inspect the stake-to-text joints; they take all the bending load, so re-export with more overlap if one looks thin.
- Wash before use, and push the stakes in vertically rather than rocking them sideways.
Make It Yours
- Name mode with a heart symbol on each side for a first-birthday smash cake.
- Multi-Line "happy 30th" over the name, in mirror gold acrylic.
- Two Stakes "Mr & Mrs" spanning a wedding cake tier.
- Baby shower: the name-to-be in pastel glitter acrylic.
- Batch mini toppers at 60 mm wide as cupcake picks; one sheet yields dozens.
- Anniversary topper: names plus the year, with the year scored rather than cut for contrast.
- Print a topper in glow filament for a sleepover party cake.
- Keep the topper after the party and hang it as an ornament; add a small ribbon hole in your laser software.
New free tools, every month.
New laser cutting tools, what's coming next, and features we're building right now. Only MyLaserTools.com news. No spam, ever.
© 2026 MyLaserTools.com. All rights reserved.