Making a classic blue-water city map with the Blue Water Map preset
Difficulty: Easy. Time: under an hour of design time, then your print run. Best method: full-colour / UV print (the cyan water is the whole point). A laser version works as a two-tone cut with the water cut from blue acrylic.
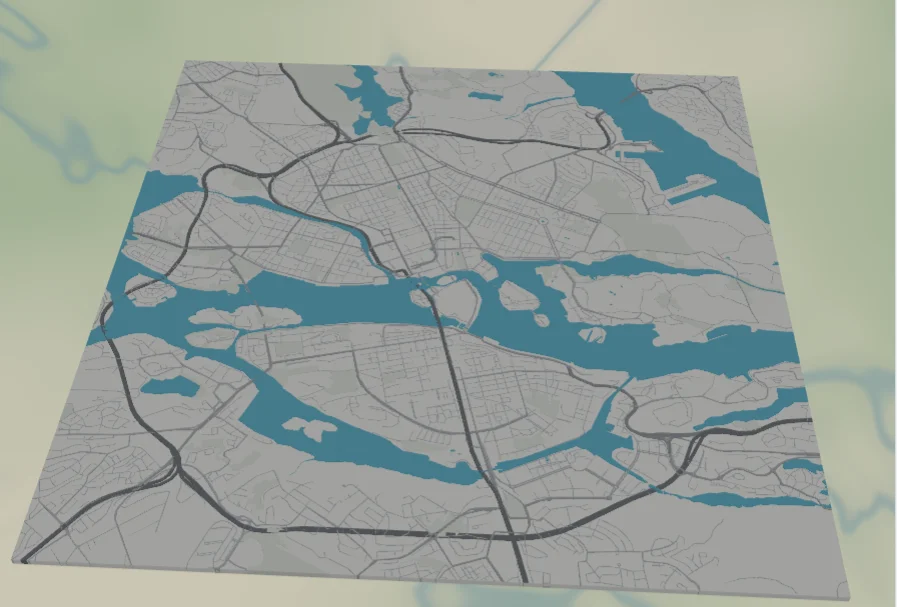
This is the cleanest, most-loved map aesthetic on the internet: pale grayscale streets on near-white land, with water in a single bold cyan. The contrast does all the work - the eye locks onto the shape of the water first, then reads the city around it. Stockholm is a perfect showcase because its archipelago and inlets push cyan deep into the street grid, so the water becomes a branching, organic shape rather than a flat block.
Everything here is solid colour fill and line, so the design lives or dies on that one decision: keep the land light, the roads quiet, and let the water carry the colour.
What You'll Need
UV print / sublimation
- The exported high-res PNG (4096 px)
- UV flatbed printer, or a sublimation setup with a coated white blank (hardboard, aluminium, ceramic)
- A bright white blank keeps the cyan water as vivid as possible
Poster / paper print
- The exported high-res PNG sent to a photo lab or printed on smooth matte art paper
- A simple white or light wood frame keeps the focus on the water
Laser (optional, two-tone)
- A sheet of cyan acrylic for the water and a white or light backer for the land
- Any diode or CO2 laser
- Note: treat the water as a cut shape and the roads as engraving - the colour comes from the acrylic, not the laser
Step 1 - Start from the preset
Open the Blue Water Map preset. It opens on Stockholm at zoom 12.4 in a square (1:1) frame, which captures the central islands and the surrounding water. Pan so the water reaches into all four edges of the frame - the more the cyan branches through the city, the stronger the look. Any waterfront or archipelago city (Venice, Amsterdam, Vancouver, Helsinki) works just as well.
Step 2 - Tune the layers
The preset is a single layer group, "Blue water city", and every feature is Solid fill or line. The balance between the three tones - land, roads, water - is the whole design:
- Land - Solid fill, near-white
#F4F4F2. The bright base that makes the water pop. Keep it light; tinting it grey kills the contrast. - Water - Solid fill, bright cyan
#3FC1E0. The hero colour and the only saturated element. Nudge it toward teal#2BB0CFfor a cooler look or sky-blue#5BC8E8for a softer one. - Park / landuse - Solid fill, barely-there
#E6EAE4. Green spaces read as the faintest shift from the land, so they never compete with the water. - Roads - Solid fill, a grayscale hierarchy from medium grey motorways
#7A7F85(width 5) down to pale street mesh#CDD1D5(width 1.2). The roads should sit quietly between the land and the water. - Tertiary / streets - The fine mesh that fills the islands; ease the street width down if a dense old town reads too busy.
The one rule: only the water is allowed to be saturated. If you recolour the water, keep everything else neutral so the contrast holds.
Step 3 - Export
- UV / sublimation: export the high-res PNG (4096 px). Keep the Background toggle on so the near-white land prints as a solid field, or turn it off to let a white blank become the land.
- Poster: same high-res PNG, sized to your paper. The square 1:1 frame suits a 12x12 or 20x20 print.
- Laser (optional): export the per-layer SVG ZIP. Cut the Water layer from cyan acrylic, mount it behind a white land layer, and engrave the road network on top.
Choose Your Build Method
UV print / sublimation
- Export the high-res PNG. Print onto a bright white blank to keep the cyan as vivid as possible - white hardboard, aluminium, or ceramic all work.
- For sublimation, mirror the image and press onto a coated white blank per its spec. The whiter the substrate, the punchier the water.
- On a UV flatbed, lay down a white underbase if printing on anything but pure white so the cyan stays saturated.
- A matte or satin finish reads as a clean modern map; gloss makes the cyan even more electric.
Poster / paper print
- Send the high-res PNG to a photo lab or print on smooth matte art paper - a smooth stock keeps the grayscale roads crisp.
- Frame in white or pale wood to keep all the attention on the water shape.
- The 1:1 square crop is set for you - keep it square, or re-export after switching to a portrait ratio for a taller framed piece.
Make It Yours
- Waterfront cities are the sweet spot: Stockholm, Venice, Amsterdam, Vancouver, Hong Kong - anywhere water reaches into the streets.
- Cool the water toward teal
#2BB0CFfor a more contemporary feel, or warm it to a sky#5BC8E8for a softer, calmer print. - Keep the land truly light - if you want a hint of warmth, go cream
#F6F3ECrather than grey. - Add the city name and coordinates in a thin modern typeface under the map for a clean editorial look.
- Print large (20x20 square) in a white frame as a bright, gallery-clean statement piece.
- Turn the street mesh down a touch for a more graphic version that leans on the major roads and the water shape.
New free tools, every month.
New laser cutting tools, what's coming next, and features we're building right now. Only MyLaserTools.com news. No spam, ever.
© 2026 MyLaserTools.com. All rights reserved.