Making a suburban pools map with the Backyard Pools Map preset
Difficulty: Easy–Medium. Time: about 1–2 hours of machine and glue time once your file is exported. Best methods, in order: laser engraving, UV print, 3D printing - the fine street grid engraves and prints more reliably than it cuts.
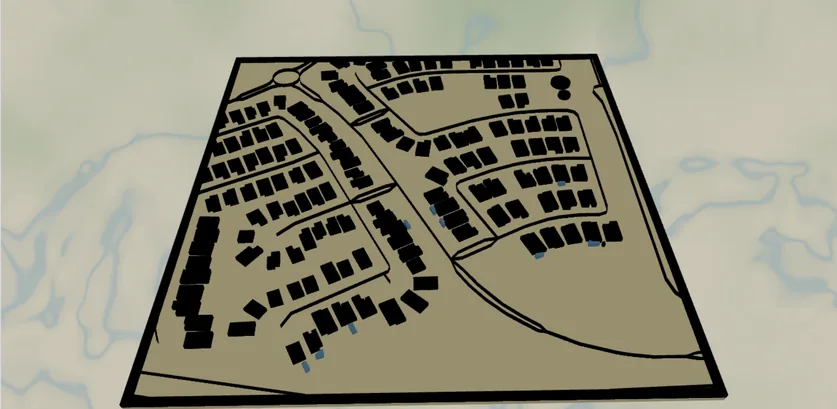
This preset zooms right down to street level over a single sunny neighborhood: a black grid of roads and building footprints sitting on a warm desert-sand backplate, with every backyard swimming pool picked out in bright blue. It opens over a suburb west of Phoenix at zoom ~16.6, close enough that individual houses and their pools are visible - exactly the playful detail this design is built around.
It's a charming, instantly readable piece for anyone who lives somewhere hot and pool-dotted: Arizona, California, Florida, Spain, Australia. The pools are the joke and the focal point, scattered like blue confetti across the tan suburb. The design ships with a black framed border already enabled, so it reads as a finished poster straight out of the box.
What You'll Need
Laser cutting
- 3 mm laser-grade plywood or MDF for the engraved plate (1 sheet)
- 3 mm acrylic in desert tan for the backplate, plus a small offcut of blue acrylic for inlaid pools (or paint it after cutting)
- Any diode or CO2 laser that fits your target size (200×200 mm and up works well at this zoom)
- Wood glue or CA glue, clamps or weights, sandpaper (220 grit)
3D printing
- Any FDM printer; PLA in 3 colors (tan, black, bright blue) or a single color
- Slicer that accepts 3MF (Bambu Studio, PrusaSlicer, OrcaSlicer)
UV print / sublimation
- The exported high-res PNG
- UV flatbed printer or sublimation setup with a hardboard/aluminum blank
Step 1 - Start from the preset
Open the Backyard Pools Map preset, then search for your own neighborhood and pan until a good cluster of pools sits in the middle. The preset opens at zoom ~16.6 over a Phoenix-area suburb - very tight, so individual pools show. This zoom is essential to the design: zoom out much past 15 and the pools shrink to dots. The export is locked to a square 1:1 frame, which suits a single neighborhood block nicely.
Step 2 - Tune the layers
The preset has two layer groups, top to bottom:
- Roads & buildings - the whole suburb in one Solid layer: black
#000000building footprints and the full road hierarchy (motorway, primary, secondary, tertiary, street, minor and their links, drawn 5 px down to 1 px), plus the star of the show - every backyard pool (waterSwimmingPool) filled bright blue#0096c7. Solid means the laser fill-engraves it, or it prints / 3D-prints as the colored bodies. The pools are the focal points scattered across the black grid; if a neighborhood is pool-rich the effect is delightful, so pan until a denser pocket sits in frame. - Backplate - solid base plate, desert sand
#e9d8a6. Change this color to match your acrylic or paint. - Border - a black framed border (
globalBorderConfig) is enabled with 10 mm padding, so the design comes pre-framed.
If the black road-and-building layer feels too heavy, drop the smaller road features (minor, street, tertiary) and keep only the main roads so the pools stand out more.
Step 3 - Export
- Laser: export the per-layer SVG ZIP. The Roads & buildings layer (black grid plus the blue pools) is Solid, so fill-engraving it onto the tan plate is far more reliable than cutting the fine streets. For a premium two-material look, cut the pool shapes from blue acrylic and inlay them. Cut the Backplate and outer border. Turn on small-polygon cleanup to drop slivers.
- 3D printing: export 3MF for a multicolor stack (tan plate, black roads/buildings, blue pools), or STL for single color.
- UV print: export the high-res PNG (4096 px). Keep the Background toggle on so the sand plate prints as a solid color, or turn it off for a transparent-background print on a colored substrate.
Choose Your Build Method
Laser cutting & engraving
This design has fine street lines and small pool shapes, so engraving the detail onto a single plate is the reliable approach - cutting the thin roads would leave fragile or lost geometry.
- Cut the Backplate and its black border from your tan material first - it's the registration reference for everything else.
- Fill-engrave the Roads & buildings layer directly onto the tan plate - the black road grid, building footprints, and the blue pools all live in this one Solid layer, so they engrave together in one pass with no loose pieces.
- Pools: the simplest route is to engrave them and paint the recesses blue. For a premium look, cut the pool shapes from blue acrylic and inlay them into matching pockets engraved into the plate.
- If inlaying, seat the blue pools with thin glue - or skip the squeeze-out with 3M tape: 467 or 468 transfer tape for acrylic, 300LSE for harder materials. Weight flat for 30 minutes.
- Sand the edges flush, finish with oil or clear spray.
Make It Yours
- Pool-dense suburbs shine here: Phoenix, Scottsdale, Las Vegas, Palm Springs, Miami, the Gold Coast, Marbella - anywhere backyards are full of blue.
- Center it on a specific street and give it as a housewarming or pool-party gift - the recipient finds their own pool in the grid.
- Swap the backplate to terracotta
#cb997eor pale stucco#f5ebe0to match a different climate. - Recolor the pools to teal or turquoise, or make them all the same bold cyan for a more graphic, poster-like effect.
- Drop the smaller roads (minor, street, tertiary) so the pools read as the clear focal point against an open suburb.
- Engrave the neighborhood name or a coordinates line into the bottom border band before assembly.
- Use the Hanger hole ring mounting option and cut at coaster or ornament size for a fun desk or fridge piece - or add a snap clip and call it a keychain.
New free tools, every month.
New laser cutting tools, what's coming next, and features we're building right now. Only MyLaserTools.com news. No spam, ever.
© 2026 MyLaserTools.com. All rights reserved.