Making an aviation plaque with the Airport Diagram preset
Difficulty: easy. Time: 30–60 minutes printed, 2–4 hours as a 3D plaque. Best methods, in order: UV printing, 3D printed plaque, sublimation on white metal panels, laser engraving on coated materials.
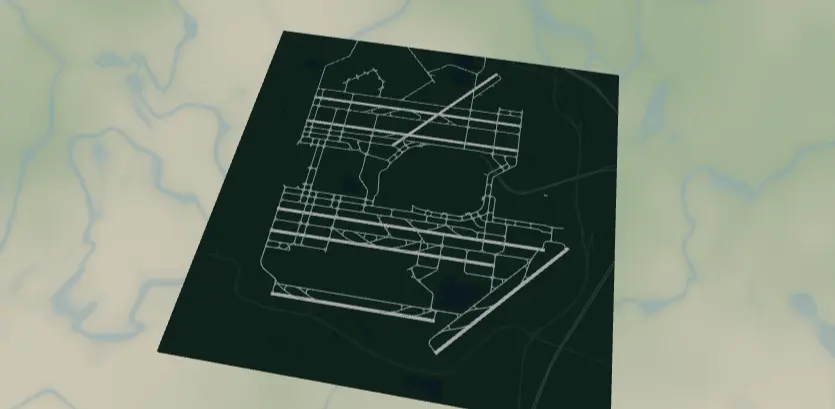
This preset draws an airport the way pilots see it on a taxi chart: bold white runways and pale taxiways on a deep aviation-green field, with surrounding roads knocked back to faint dark greens so the airfield owns the frame. It makes a seriously good gift for pilots, controllers, av-geeks, and frequent flyers - "the airport where I soloed" is a guaranteed hit.
What You'll Need
- UV printing: flatbed UV printer, black or dark acrylic, aluminum composite panel, or dark-stained wood
- Sublimation: sublimation printer + paper, white poly-coated aluminum panel (the dark field must come from ink, so the blank needs to be white), heat press, heat tape, butcher paper
- Laser engraving: laser plus a reveal material - black/green-coated anodized aluminum or two-tone acrylic; raw wood works but means rastering the whole dark field
- 3D printing: multi-color printer; dark green, white, and a soft gray-green filament cover the whole design
Step 1 - Start from the preset
Open the Airport Diagram preset. It loads Chicago O'Hare at zoom 12.8 - wide enough to capture all of ORD's crossing runways with margin. Search your airport by name or code; then set zoom by airport size: a mega-hub like ATL or DFW wants 12.5–13, a regional field with one runway wants 14–15 so the runway isn't a toothpick. Center on the runway intersection geometry, not the terminal - the crossing white bars are the composition. Rotate your framing choice around keeping every runway end inside the square.
Step 2 - Tune the layers
One Solid layer group, Airfield:
land-#0E3B2Edeep aviation green, the field.water-#0A2C36near-black teal for lakes and shoreline (matters at airports like SFO or boston Logan).aerowayRunway-#FFFFFFwidth 6, the heroes. Width 6 is a real filled ribbon, so runways print as solid bold bars.aerowayTaxiway-#BFD8CFwidth 2, the pale green-gray web feeding the runways.roadsMotorway#3E6557width 2 androadsPrimary#33584Bwidth 1 - deliberately just one shade above the field. They're context, not content; in sublimation these subtle dark-on-dark tones may vanish entirely, and the design survives fine without them.
If your airport's taxiway data is dense (big hubs), the width-2 taxiways can get busy - drop to width 1.5. For a single-runway field, bump runway width to 7–8 for poster punch.
Step 3 - Export
- UV / sublimation: 4096 px PNG, background ON - the green field is the design. On dark green or black substrate, toggle Background off and let the substrate be the field (also hide
waterand the two road tiers, which would print as faint dark patches). - Laser: per-layer SVG ZIP, with background handling per the method below.
- 3D: 3MF export.
- Corner holes are the right Mounting holes pick - this design begs for standoff mounting like a framed approach plate; anodized standoff spacers come in multiple colours to match. No cleanup needed; airfield geometry is naturally chunky.
Choose Your Build Method
UV printing
- Export the PNG. For black acrylic, use the transparent-background variant so the runways and taxiways print straight onto the dark panel.
- In the RIP, size to the panel and add a white underbase beneath the runway/taxiway art for opacity on dark substrates.
- Clean, register, print.
- Optional: a second white pass on just the runways makes them pop like fresh paint.
Sublimation
- Keep the full background - the blank must be white poly-coated aluminum or hardboard, and the ink builds the green field.
- Print mirrored at final size.
- Tape to the blank, butcher paper above and below.
- Press with the settings recommended for your material, paper, and inks.
- Peel hot. The white runways are "no ink" zones, so they reveal the white blank - crisp and bright. Expect the faint
#3E6557/#33584Bcontext roads to disappear into the field; that's acceptable loss.
Make It Yours
- Great-geometry airports: O'Hare's crossing pairs, ATL's parallel quintet, Schiphol's sprawl, tiny grass strips at zoom 15 for the GA crowd.
- Chart-style swap: field
#1A1A1A, runways#FFD60A, taxiways#6E6E6Efor a night-ops look. - FAA-diagram swap: field
#FFFFFF, runways#1A1A1A, taxiways#7A7A7A- the official chart aesthetic, and the variant that engraves perfectly on raw wood. - Make a series: the three airports of a pilot's career - first solo, checkride, current home base - on matching panels.
- Toggle the two context road tiers off entirely for a pure airside diagram.
- Add a route layer tracing a memorable taxi route or the approach path in
#FFD60A. - Circle export shape + Hanger hole = airport ornament; runway crossings look great in a round crop.
- Pair with the Transit and Rails preset of the same city for a transportation-nerd diptych.
New free tools, every month.
New laser cutting tools, what's coming next, and features we're building right now. Only MyLaserTools.com news. No spam, ever.
© 2026 MyLaserTools.com. All rights reserved.