Printing a large terrain relief in tiles with the 3D Topography Split preset
Difficulty: Intermediate. Time: a weekend of printing. Best methods, in order: 3D printing, laser cutting.
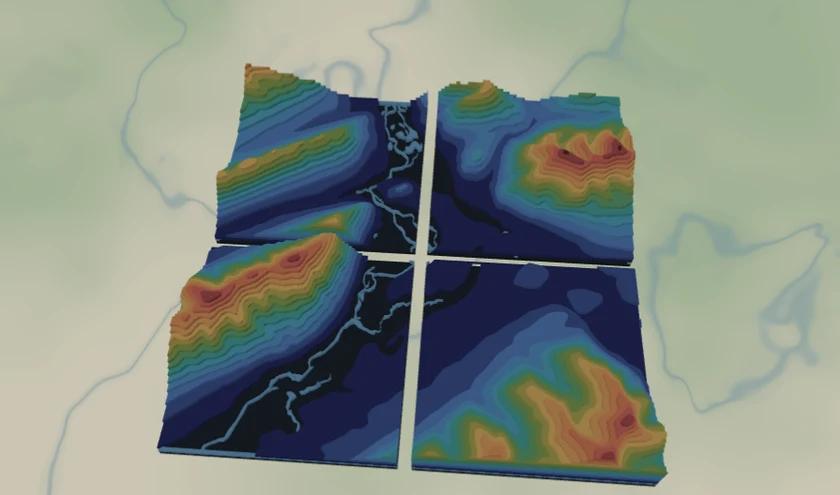
A big relief rarely fits one print bed. This preset sizes the contours to 420 x 420 mm and splits them into a 2x2 grid of ~210 mm tiles that fit common FDM beds (Ender, Prusa, Bambu) and join into one large model. The contours are sliced from a single source, so the terrain steps line up across every tile boundary.
What You'll Need
3D printing
- An FDM printer (210 mm tiles fit a 220 x 220 mm bed), PLA in stone gray or white
- An STL/3MF-capable slicer
- Glue or interlocking pins to join printed tiles
Laser cutting
- Thin contour sheets and a backing board if you'd rather cut the split layers and stack them per tile
Step 1 - Start from the preset
Open the 3D Topography Split preset. It loads on the peaks near Banff with split already enabled. Search your terrain and keep zoom ~11.5-12.5 so the contour terraces read well.
Step 2 - Check the split and bands
- The Tile for large format panel is already on: 420 x 420 mm output, 2 x 2, giving four ~210 mm tiles. Adjust output size or columns/rows to match your bed - the shown tile size updates live.
- Tune the elevation bands first (delete empty high layers, bracket your terrain) - the same tuning as the Topography preset.
Step 3 - Export the tiles
- With split on, STL tiles (ZIP) and 3MF tiles (ZIP) produce one printable file per tile, each geometry-clipped to its region so the stepped relief is correct.
- Print tiles one at a time; assemble into the full relief afterward.
Choose Your Build Method
3D printing
- Open each tile STL/3MF and print flat, no supports, at 0.12-0.16 mm for crisp contour steps.
- Keep track of tile order using the file names (tile-r1-c1 ...).
- Glue the printed tiles edge-to-edge; the contour steps continue across seams because every tile is sliced from one source.
- Scale up if you want a bigger relief - increase the output size in the preset and re-split.
Make It Yours
- Match your printer: set the output so each tile lands just under your bed size (e.g. 256 mm tiles for a Bambu).
- Go large: a 3 x 3 grid of 200 mm tiles makes a ~600 mm tabletop relief.
- Hypsometric tints via 3MF for banded color across the assembled model.
- Add a route layer tracing a favorite trail or ski run over the contours before splitting.
New free tools, every month.
New laser cutting tools, what's coming next, and features we're building right now. Only MyLaserTools.com news. No spam, ever.
© 2026 MyLaserTools.com. All rights reserved.